Pages

Tuesday, 15 May 2012

English Civil War Pioneers, Billhook and firelock - Part 2 of 2

Again this miniature has been modified from Warlord Games 'Firelock Storming Party' plastic figure, but with this figure the arms were taken from a 'Dismounted Dragoon' Perry Napoleonic figure supplied free in a previous issue of Battlegames.


Before paint
After paint
The billhook shaft was made by trimming down the original musket to form the handle and the head was modeled from a flat section cut from a plastic sprue. From the original firelock figure, the hand was trimmed away from the firelock. Then the firelock has cut into two pieces and glued in position to give the impression it was being held by the left hand. It's not the best or neatest modification (seen from the inside it looks plain awful) but works ok from a distance.


Again this figure is based on a penny in order to distinguish them from regular firelock figures.

Monday, 14 May 2012

English Civil War Pioneers, Pistol and Axe - Part 1 of 2

The two figures detailed in these two posts are both based on a plastic Warlord Games 'Firelock Storming Party' miniature. Both were actually spares I had standing around (they had been given out free by the nice Warlord chaps at a wargame show).
Original figure - note the length of the axe shaft
Both made to represent pioneers; soldiers who would physically clear the way through obstacles enabling the main force to proceed unhindered. Lightly armed for self defense and speed I've given these figures agricultural implements to help them do their job. 

Simple top tip: if you going to have a go at modifying any figure, remember to place diagonally opposite limbs in the correct position i.e. the right arm and left leg forward or visa-versa. It's surprisingly easy to forget this (I have) and end up with a model that looks distinctly odd but without being immediately obvious why.

The first figure involved taking the parts supplied on the same sprue as the figure. The left hand side was made by trimming away the right hand and arm from the standard firelock supplied with the figure. The left hand was cut off at the sleeve and rotated through approx ninety degrees and glued back onto the arm. The arm was then attached to the body and gap under the arm was filled in with greenstuff.

This figure kept bugging me; it simply didn't look 'right' so I left it standing forlornly to one side for a couple of weeks. I wasn't entirely happy with the way I'd positioned the axe. You would normally carry it nearer the axe head (i.e. nearer the centre of gravity - next time you pick up long handled brush/broom you'll naturally grab it nearer to the head, try it and see for yourself). One night, after a sudden rush of blood to the head, armed with clippers I shortened the end of the handle, removed the axe head and removed a fair chunk of the shaft. I then re-glued the head back onto place. Voila - an actual hatchet job (sorry for the dreadful pun).

All new, improved final version

As the figure isn't carrying a firelock I removed the small belly box on the front of the figure. The right arm with the pistol was a spare taken straight from the Warlord Games ECW cavalry box set.

The figure was fixed to a round base (one penny piece) in order to emphasise that they are special troops and not standard firelock figures.

Wednesday, 9 May 2012

Queen's Sconce, Newark-on-Trent, Nottinghamshire

The town of Newark is located on the intersection of the Great North Road, the Fosse Way and the lowest crossing of the River Trent and hence controlled the gateway to the north. During the English Civil Wars the town was besieged three times by Parliament forces. The first two sieges were relieved by Royalist armies. It was after the second siege that the Royalist forces decided to greatly strengthen their defensive positions around the town.
Modern reconstructive illustration
One of the resulting structures, the Queen's Sconce (from a Dutch word meaning fort) is one of Europe's best preserved earthwork fortifications. The Royalist stronghold is named after the wife of Charles I, Queen Henrietta. There was also a King's sconce to the north-east of the town.

Located on elevated ground to the south-west of the town the sconce provided cover to the town, River Devon (previously called the River Smite) and the main roads. 

The third siege began in November 1645 with the Parliamentarian forces being led by General Sydenham Poyntz. Richard Franck wrote in the 'Northern Memoirs' (1658),

"such deep graffs, bastions, horns, half-moons, counterscarps, redoubts, pitfalls, and an impregnable line of sod and turf palisade and stockade every fort so furnished with great guns and cannons that this bulky bulwark of Newark represented to the siegers but one entire sconce."
The Siege lasted six months and on 27th April 1646 Lord John Belasyse Governor of the town, surrendered the town under direct orders from the King.
In one of those strange quirks of history the earthwork survived for the same main reason that caused the town to fall - the plague. After the Royalist surrender the Parliamentarian forces withdrew as quickly as possible from the area due to the threat of plague. The locals were ordered to dismantle all the earthworks but understandably failed to do so. Hence the Queen's Sconce remains in such an impressive state today.
A few quick 'interesting' facts:
  • The sconce covers an area of 1.2 hectares,
  • It is 9m (29' 6" ) high and 92m (302') wide,
  • the ditch (at is widest) is 23m (75' 5") wide and 4.5m (14' 9") deep.
  • Made of earth and gravel from the flood plain of the nearby river, strengthened by timber posts and pegs.
  • Garrison was normally 20 soldiers but 150 when under threat.
  • The sconce housed five artillery pieces during the siege two in both the west and south bastions and a single piece in the east bastion.
Although the sconce is easily visible on Google maps, the scale of the sconce still took me by surprise. The earthwork is now the centre piece of a refurbished park, small trees and bushes have been cleared from the ditches and banks. A small metal footbridge directly opposite the original has been installed enabling easy access into the interior of the earthworks.

View from the east bastion looking inwards.
Note the internal earth ramparts.
View from north bastion looking south west
Note the fields beyond the fort. General Poyntz eventually established his field HQ (on the second line of circumvallation) in this area, just behind where the small modern brick building now stands.
View from the west bastion looking north
On the horizon is visible the spire of the parish Church of St Mary Magdalene. The castle (not visible) is located just to the left of the church.
View from the west to south bastion
Note the modern footbridge.
Inside the tourist information centre, located in the grounds of Newark Castle itself, is a very nicely detailed 1/56 scale (28mm) model of the sconce. It reveals just how formidable the fort must have been during the siege.
Queen's Sconce
1/56 scale model
Interior view of sconce
1/56 scale model
Here's one I made earlier.
This is my attempt at making a similar fortication. Made with the Queen's Sconce in mind, I made this way back in 2009/2010 without visiting the actual site itself.

Tuesday, 8 May 2012

Desk Snapshot May 2012

As I needed a quick break from my proper job, here is a picture of my workspace taken late one evening last week. In what will be a highly irregular (as per usual) series this sneak preview picture was taken after a modeling and painting session after which I had been taking a few WIP images for various ongoing projects. As the previous posts detailing the modeling and painting of the latest pirate (fisherman) ogre seemed popular I thought I would make this approach more of a regular feature.
Desk Snapshot May 2012

  1. What will eventually be 'Lord Dudley', standing command figure - modified plastic Perry Miniature.
  2. 'Lord Dudley & Standard Bearer', mounted command figures - modified plastic Perry Miniatures.
  3. 2000 AD characters: Angel Gang, Judges, Torquemada etc. - Foundry Miniatures.
  4. Plastic Mounted Men at Arms (Wars of the Roses) - Perry Miniatures.
  5. Modified firelock figures - Warlord Games.
  6. 1/35 (54mm) scale WWII Russian officer - Miniart.
  7. 'Not Captain Scarlet' figures, 'Not the Prisoner' - Crooked Dice.
  8. Allosaurus - Menacing Monsters. Behind this are the recently completed Mega City Judges.
  9. Halo Lego-type figure, bought for a pound from local Morrison's supermarket.
  10. Petard Team - Warlord Games, Canadian Voltigeurs - Knuckleduster Miniatures, Glengarry Light Infantry - (plastic riflemen) Perry Miniatures. 
Just of the right of this image (off stage) is the painting tray I normally use, courtesy of my mate Ade.
And yes, I do need to put my paints in some kind of order. And yes, I probably should just concentrate on one project at a time but I get bored too easily. As my dear old nan used to say, "Variety is the spice of life". That's my excuse anyway.

Friday, 4 May 2012

Pirate Ogre Fisherman, the Highlight - Part 6 of 6

The final step of the painting technique I employ is the 'Highlight Stage'.
Completed Ogre Fisherman
This stage is obviously when, in order to create a highlight, I normally add a little Vallejo white paint from one of their dropper bottles, or another lighter complimentary shade (with red, for instance, try orange or yellow unless you actually want pink highlights). Depending on what effect you want to achieve, it is during this stage that you can gradually build up the levels of highlight by adding increasing amounts of the lighter shade to the main colour.
I realise that my highlights often appear too harsh or stripy on my photos but under normal light conditions these look far more subtle (honestly, your Honour).


Rear View
It was at this stage I also repainted the fish tails. The previous effects didn't work at all, but with the help of Google Images (praise be) I managed to find a decent photo to copy off. The figure was then given a coat of Winsor and Newton Galeria Acrylic Satin Varnish to seal the paint. I then spray the figure with Games Workshop's Purity Seal varnish which is the only varnish I know that gives a consistently matt finish. Once dry I then finally reapply the Galeria Acrylic Satin Varnish to any 'metal' parts to give them a bit more sheen and give the model an extra contrast.
Although I wasn't entirely happy with a few details, such as where the loop in the chain is joined together (I should have used strips of greenstuff rather than that unshapely blob) overall I am pleased with how the model turned out.

Hopefully these few posts have encouraged readers to have a go at modifying or converting their own miniature. You can, if you're so inclined, produce an entirely unique set of figures. The multi-part nature of these particular range of figures really do lend themselves very well to this process.

I've hit a bit of a impasse (modeller's block?) in regard to the final figure in this pirate ogre theme mini-series so he may not appear for a while.

Thursday, 3 May 2012

Pirate Ogre Fisherman, the Wash - Part 5 of 6

The next step is the 'Wash' (or shading) phase. This stage can to useful to cover up any mistakes made during painting in the block colours. I generally use Games Workshop washes but you can also use artist inks or even a darker shade of the 'block' or main colour used previously.
Ogre - Applied wash
Ogre - Applied wash
Flesh Wash applied over the areas painted with Tallarn Flesh. I don't apply the wash over all the flesh areas of the figure (which would give the same effect as the 'dip method'. I simply apply the was into the creases or folds of the model. If you use a table lamp during painting, simply hold the figure close to the light and turn the figure to and fro as this will exaggerate the shadows.

I often hold the figure upside down when applying this layer so that the wash will naturally flow in the area that would form a shadow.

Ogre profile - Applied wash
GW Devlan Mud wash was used to give depth to the 'leather' bindings on the fishing rod and Baal red to shade the right trouser leg.

Ogre Rear view - Applied wash
Gryphonne Sepia wash added to the snap bag.

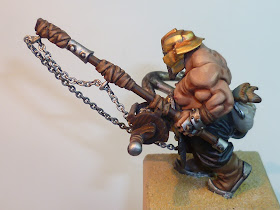
You may note that I have painted the helmet over with a wash of gold paint. This is just a personal preference as I like the effect it achieves. I think it gives a bit of extra 'warmth' to contrast against the 'cold' look of the iron/steel colour components.

As mentioned in the previous post you could easily stop after this level of painting and still have an effective looking figure. But the next simple stage will again help finish off the model.

Wednesday, 2 May 2012

Pirate Ogre Fisherman, the Block - Part 4 of 6

The first stage of painting the block phase where the main colours are applied to the model.
Ogre - Block colour (main) painted
As mentioned previously this figure is painted using eight main colours. This could have been reduced even further if the trouser legs had been painted the same colour and the bag had been painted light brown (leather).

At the request of Ade, I gave this ogre the elite 'uniform' of red and black trousers.

A useful tip is to keep a record of what paints you use for particular figures. this is especially useful if you're creating a large unit or army. If not I guarantee you'll forget what exact colours you've used, if at sometime in the future you wish to add the unit and maintain the same uniform look.

The colours break down as follows:
Silver - Metal parts
Dark Brown - Wood
Light Brown - Leather
Black - Trouser leg
Red - Trouser leg
Flesh - Flesh bits (obviously)
Cream - Linen snap bag
Sand - Base
Ogre profile - Block (or main) painted
Note that this stage the right hand is still held in postion with Blu-Tac. This allowed me to paint the areas behind then anchor. If you are so inclined you could stop painting after this stage and the figure would be perfectly acceptable on the tabletop when seen from a distance (and GW tournaments). However with just a bit more time and effort you can transform the figure completely. How? I'll explain in the next couple of posts (what a tease!).