Wednesday, 4 July 2012

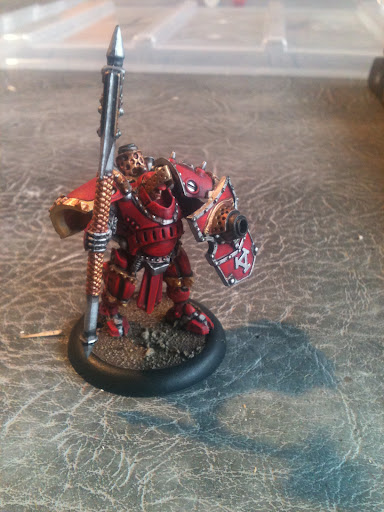
Man-o-War Shocktrooper, Warmachine (Privateer Press)

During a pleasant English summer evening (i.e. taking shelter from the awful recent weather) in my mate Ade's (WargamingForFun) man cave I was perusing his unpainted figures. To repay his hospitality (more tea and home-made cakes than a grown man can handle) I offered to paint a figure for him. As he is currently going through a Warmachine-phase, which appears to me to be a Cold War/steampunk'ish inspired game, I picked this Man-o-War Shocktrooper.

This a figure from the Khador faction (communist?), the utilitarian look and simply colour scheme did appeal to me. I even managed to play a couple of games as I could pick up the simple basics of the rules after a few games.

Normally I would assemble the model after painting but Ade had already glued it together, even so the plastic figure is very easy to paint. Following the examples in the rules boxes this model is basically red all over with gold and silver details. I employed my usual three layer technique playing particular attention with the washes to add shade to the heat affected areas around the vents and shield muzzle etc.


If you noticed a distinct improvement with the quality of the photographs that would be because I didn't take them. Ade kindly did the honours as my mom had asked to have her camera back to take with her on holiday (cheeky minx!).

I'm now painting a Kommander Sorscha Warcaster figure and will post that as soon as it's done.

Tuesday, 12 June 2012

Pirate Ogre Whaler - Part 3 of 3

The figure was painted using my usual 'Block, Wash and Highlight' method. As I mentioned to my mate Ade (WargamingForFun) recently I really find painting a necessary evil.


Hat & Tattoo Detail
I added the anchor and sperm whale tattoos along with his latest tally onto the ogre's shoulder.
Rear View
The false leg was painted to resemble whale bone/ivory - based on Gregory Peck's portrayal of the character Captain Ahab from the film 'Moby Dick'.

I also added a little red and green (as I believe ogres are equal opportunity killers) gore to the cleaver .

The only drawback to this figure is now I think he bears an unhealthy resemblance to the guitarist Slash from the popular 80's rock combo Guns 'n' Roses (never my cup of tea, to be honest). He's only lacking the dark poodle perm hairstyle.
I do have a couple of further ideas to that would enable me to produce possibly two more ogres on a vaguely pirate theme. These, however are both on the back burner for the immediate future as I am heading in a historical direction.

Monday, 11 June 2012

Pirate Ogre Whaler - Part 2 of 3

For several weeks, this figure stood idly by, silently watching as other figures were made and painted. Then, for some reason, I recalled a comment (made by someone on TMP - thanks Skeptic!) about a previous ogre model I had made,

"Nice idea! Now, how about a pirate ogre whaler (with harpoon, of course)?"
The answer to all my problems

Aha, what a good idea. With this in mind I used Google (All Hail) Images and obtained enough reference material to be able to scratch-build the harpoon.

The main body of the harpoon itself was made from the ever useful waste plastic sprue that is normally thrown away (but being a modeller I naturally hoard the stuff).

The metal shaft was made from metal tube (actually the cut down needle from an empty liquid poly cement applicator).

The head of the harpoon was made from greenstuff, formed into a suitable pointy shape.

The rope is from scrap copper electric cable, two strands were bent around a pen and then twisted until it has the appearance of rope.

Looking at the ogre with its false leg and harpoon - it gradually dawned on me who it reminded me of; Captain Ahab (played by the late great actor Gregory Peck) in the classic 1956 film 'Moby Dick'. As I didn't really want to make a long coat (because I'm lazy and it might just appear on another ogre figure I have in mind) the other notable item of clothing in his wardrobe was his hat. This would also help distinguish him from the other ogre figures.


After removing the previous tricorn hat I did initially consider making the new hat from greenstuff but I thought using thin plastic card would be more suitable (and easier).
I rolled a thin strip of plastic sheet into a tubular, oval shape, then clamped (with small bulldog clips) and glued it in order to hold it into its new form. Just as a little detail I cut triangular shapes into the back of the hat to indicate bite marks and hint at just how this chap might have lost his leg.

Friday, 8 June 2012

Pirate Ogre Whaler - Part 1 of 3

a.k.a Yet another pirate ogre.

This figure is the latest in the occasional series of models all based around the pirate ogre theme. These few posts record the rather torturous method I used to complete this miniature.
Initial mock up
The initial idea behind this figure was to create a figure based on the Long John Silver character from Robert Louis Stevenson's classic story 'Treasure Island'. I gave the model a greenstuff eye-patch and cut off one of the legs. I had planned on giving the figure a crutch, but more of this later.

Recalling the previous ogre pirates, I had supplied one with food and drink; thinking along these lines I wanted this ogre to be a hardened booze hound so I thought 'Give him a proper drink'. Rather than just a wimpy cup I reasoned why not give him the barrel to use as a beer jug.

The jug is made from a spare barrel I had left over from a previous raid on Ade's spares box. One end was cut away to form a hollow shape (although I then went and filled it back up again with plastic off cuts and melted it all with liquid poly cement to form a smooth surface).


The pipe is made from scrap plastic sprue simply using an approximate sized drill bit to hollow out the pipe and whittling away the shaft until it looked suitably pipe-like.

Note the liberal use of Blu-Tac. I use this to try out ideas to see if they'll work. It allows you to step back (literally) and view the model from a distance to see if they look right. You will see in the inital stages I had planned on having an owl sit on the ogre's shoulder (the owl was the only model bird I could lay my hands on as I didn't fancy the hard work of making another parrot).

Once happy with the basic idea I pinned the right foot of the model to the base using a small cutoff piece of a paper clip.

The smoothly filled barrel looked quite boring so being a proper ale fan I added a nice foamy head with greenstuff. I glued the barrel directly against the ogre's hand and, when dry, added a greenstuff handle.

The earring was made from cutting away a random piece of plastic I spotted lurking in Ade's spares box.

The tricorn hat is made from the ubiquitous greenstuff.

With the belly plate, I cut away the existing triangular 'teeth' and then modelled the skull and crossbones into place with greenstuff. This was done simply by using two long strips and an oval blob of greenstuff. Then using a blade, a scribe and a sculpting tool I cut and poked the material until it looked vaguely like a 'skull and crossbones' shape.

Useless walking stick

Note the owl is still only Blu-Tac'ed into position
The false leg was made from the cap of an empty Revell poly cement needle applicator. I made the majority of this figure at roughly the same time as the pirate ogre fisherman model but I got to this stage and just hit a mental blank. The main trouble was that it looked too similar to a previous ogre figure I had made (the ogre musician/bellower) especially with the false leg. It didn't help matters that I hadn't checked to see if this was the same limb I had lopped off the other miniature. Typically it was the same left leg - ahh fudge!
Originally I thought of having the figure hobbling along with a crutch tucked under his left arm, but I simply couldn't make this work. Someone had suggested the clever idea drilling a hole between the arm and the body to accommodate the head of the crutch but I still couldn't figure how the hand would hold the support. After giving up the crutch idea I then tried to make a walking stick from sprue. But to be perfectly honest it looked awful, the angles were all wrong (see photos above). I realised that instead of looking like a fearsome monstrous brute I had just made the ogre look like a disgruntled OAP ("Go and play round your own end, pesky little ogres! Moan, moan, gripe, gripe").

Tuesday, 15 May 2012

English Civil War Pioneers, Billhook and firelock - Part 2 of 2

Again this miniature has been modified from Warlord Games 'Firelock Storming Party' plastic figure, but with this figure the arms were taken from a 'Dismounted Dragoon' Perry Napoleonic figure supplied free in a previous issue of Battlegames.


Before paint
After paint
The billhook shaft was made by trimming down the original musket to form the handle and the head was modeled from a flat section cut from a plastic sprue. From the original firelock figure, the hand was trimmed away from the firelock. Then the firelock has cut into two pieces and glued in position to give the impression it was being held by the left hand. It's not the best or neatest modification (seen from the inside it looks plain awful) but works ok from a distance.


Again this figure is based on a penny in order to distinguish them from regular firelock figures.

Monday, 14 May 2012

English Civil War Pioneers, Pistol and Axe - Part 1 of 2

The two figures detailed in these two posts are both based on a plastic Warlord Games 'Firelock Storming Party' miniature. Both were actually spares I had standing around (they had been given out free by the nice Warlord chaps at a wargame show).
Original figure - note the length of the axe shaft
Both made to represent pioneers; soldiers who would physically clear the way through obstacles enabling the main force to proceed unhindered. Lightly armed for self defense and speed I've given these figures agricultural implements to help them do their job. 

Simple top tip: if you going to have a go at modifying any figure, remember to place diagonally opposite limbs in the correct position i.e. the right arm and left leg forward or visa-versa. It's surprisingly easy to forget this (I have) and end up with a model that looks distinctly odd but without being immediately obvious why.

The first figure involved taking the parts supplied on the same sprue as the figure. The left hand side was made by trimming away the right hand and arm from the standard firelock supplied with the figure. The left hand was cut off at the sleeve and rotated through approx ninety degrees and glued back onto the arm. The arm was then attached to the body and gap under the arm was filled in with greenstuff.

This figure kept bugging me; it simply didn't look 'right' so I left it standing forlornly to one side for a couple of weeks. I wasn't entirely happy with the way I'd positioned the axe. You would normally carry it nearer the axe head (i.e. nearer the centre of gravity - next time you pick up long handled brush/broom you'll naturally grab it nearer to the head, try it and see for yourself). One night, after a sudden rush of blood to the head, armed with clippers I shortened the end of the handle, removed the axe head and removed a fair chunk of the shaft. I then re-glued the head back onto place. Voila - an actual hatchet job (sorry for the dreadful pun).

All new, improved final version

As the figure isn't carrying a firelock I removed the small belly box on the front of the figure. The right arm with the pistol was a spare taken straight from the Warlord Games ECW cavalry box set.

The figure was fixed to a round base (one penny piece) in order to emphasise that they are special troops and not standard firelock figures.

Wednesday, 9 May 2012

Queen's Sconce, Newark-on-Trent, Nottinghamshire

The town of Newark is located on the intersection of the Great North Road, the Fosse Way and the lowest crossing of the River Trent and hence controlled the gateway to the north. During the English Civil Wars the town was besieged three times by Parliament forces. The first two sieges were relieved by Royalist armies. It was after the second siege that the Royalist forces decided to greatly strengthen their defensive positions around the town.
Modern reconstructive illustration
One of the resulting structures, the Queen's Sconce (from a Dutch word meaning fort) is one of Europe's best preserved earthwork fortifications. The Royalist stronghold is named after the wife of Charles I, Queen Henrietta. There was also a King's sconce to the north-east of the town.

Located on elevated ground to the south-west of the town the sconce provided cover to the town, River Devon (previously called the River Smite) and the main roads. 

The third siege began in November 1645 with the Parliamentarian forces being led by General Sydenham Poyntz. Richard Franck wrote in the 'Northern Memoirs' (1658),

"such deep graffs, bastions, horns, half-moons, counterscarps, redoubts, pitfalls, and an impregnable line of sod and turf palisade and stockade every fort so furnished with great guns and cannons that this bulky bulwark of Newark represented to the siegers but one entire sconce."
The Siege lasted six months and on 27th April 1646 Lord John Belasyse Governor of the town, surrendered the town under direct orders from the King.
In one of those strange quirks of history the earthwork survived for the same main reason that caused the town to fall - the plague. After the Royalist surrender the Parliamentarian forces withdrew as quickly as possible from the area due to the threat of plague. The locals were ordered to dismantle all the earthworks but understandably failed to do so. Hence the Queen's Sconce remains in such an impressive state today.
A few quick 'interesting' facts:
  • The sconce covers an area of 1.2 hectares,
  • It is 9m (29' 6" ) high and 92m (302') wide,
  • the ditch (at is widest) is 23m (75' 5") wide and 4.5m (14' 9") deep.
  • Made of earth and gravel from the flood plain of the nearby river, strengthened by timber posts and pegs.
  • Garrison was normally 20 soldiers but 150 when under threat.
  • The sconce housed five artillery pieces during the siege two in both the west and south bastions and a single piece in the east bastion.
Although the sconce is easily visible on Google maps, the scale of the sconce still took me by surprise. The earthwork is now the centre piece of a refurbished park, small trees and bushes have been cleared from the ditches and banks. A small metal footbridge directly opposite the original has been installed enabling easy access into the interior of the earthworks.

View from the east bastion looking inwards.
Note the internal earth ramparts.
View from north bastion looking south west
Note the fields beyond the fort. General Poyntz eventually established his field HQ (on the second line of circumvallation) in this area, just behind where the small modern brick building now stands.
View from the west bastion looking north
On the horizon is visible the spire of the parish Church of St Mary Magdalene. The castle (not visible) is located just to the left of the church.
View from the west to south bastion
Note the modern footbridge.
Inside the tourist information centre, located in the grounds of Newark Castle itself, is a very nicely detailed 1/56 scale (28mm) model of the sconce. It reveals just how formidable the fort must have been during the siege.
Queen's Sconce
1/56 scale model
Interior view of sconce
1/56 scale model
Here's one I made earlier.
This is my attempt at making a similar fortication. Made with the Queen's Sconce in mind, I made this way back in 2009/2010 without visiting the actual site itself.