Tuesday, 1 April 2014

Celtic Cross

This model is very loosely based on the famous Carew Cross in Pembrokeshire. After seeing the original in southwest Wales I thought I could make a model of something similar but not an accurate copy as that would be way too much like hard work.

Like most men of a certain age I enjoy a good whittle which I suspect is a bit of a dying art. The model itself has been whittled down from a hard pink foam using a very sharp scalpel (I'm always pleased when I made a model and don't manage to injure myself in some manner). I've no idea what is actually is or what it is called but it's a product used in the automotive industry and is apparently, size for size, more expensive than Carrara marble. The material was procured by (in)famous Pensnett Modelling Club member Malc so its probably best not to know exactly how it ended up in his hands ("They are definitely waste off-cuts officer, Honest Malc said so.").

Thursday, 13 March 2014

Gravestones, Renedra Ltd

These pieces are taken from the Gravestone Set from Renedra, probably better know for producing the plastic figures for Perry's, Warlord Games Fireforge Games and others. The box comes with forty four various gravestones and two separate ravens, sculpted by Steve May from Immortal Miniatures (as it tells you on their website). 
Cross grave markers with additional slats.
28mm Crusader Miniature Man-at-Arms shown for scale
I've placed all the 18th and 19th century style gravestones together onto plastic bases but separated the simpler, older style stones onto singles so I can use these in medieval period games. After seeing at medieval illustrations (and a few modern ones still visible in northern Europe) I added two small lengths of coffee stick stirrers to form a roof for the cross.
A number of the stones are modelling at an angle, quite a common sight in old graveyards, well until Heath & Safety operatives started to push them over to ensure they were 'safe'. I've altered a few more to enhance the look.
28mm Crusader Miniature Man-at-Arms shown for scale (he gets around a lot, doesn't he?)

There are nicely sculptured details on the graves, vines, engraved text etc. and a very simply way of adding extra detail to your table top.

Tuesday, 4 March 2014

Great Round Tower

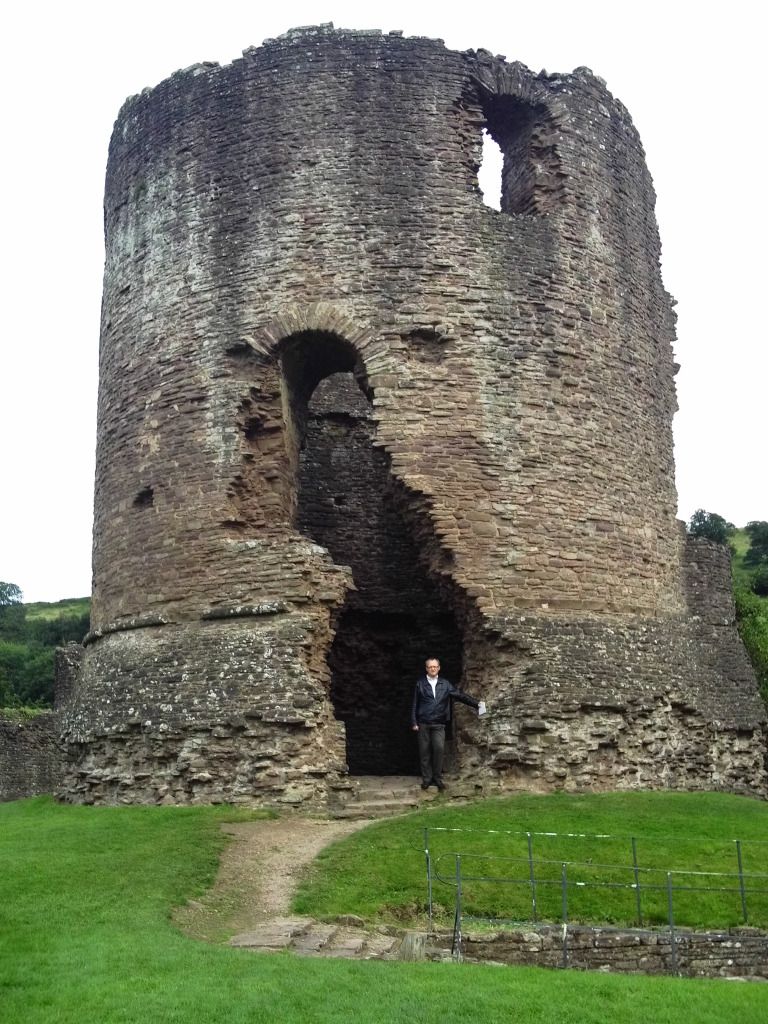
This, I'm very glad to say, is the completed model of the Great Round Tower based on the castle at Skenfrith. With expended delays it actually took just over a year to finish. In real terms it probably took about a two weeks to build but there were several times when this model was very nearly consigned to terrain heaven when I was sorely tempted to launch it into the nearby park via my size ten boot.  

Its torturous development can be followed by viewing these previous posts (click on the links for a blow by blow account).


The reason I decided not the fix the hourdings or the entrance stairway in place is a simple one. Travelling through  northern France you will often see medieval castles in a decent state of repair, for instance  the keep at Falaise which was shelled by the Allies during for WWII. It occurred to me that by making the woodwork removable the piece could then be used on the tabletop for a setting anywhere in between the 13th to the 21st century.
Hourding painting detail
If I thought the hourdings was complex, attempting the stairway and entrance was a different league. The model sat, ignored, for several months on my desk. At one stage I even moved it out of sight to avoid it causing me further annoyance. It was a trip to south Wales to see the original inspiration, Skenfrith and other nearby castles, that finally goaded me into finishing this project. Seeing illustrations and reconstructions give me a better idea of how to attempt this final part of the model, but this was still a very much a hit and miss affair. Several abortive attempts were made using bamboo barbecue skewers and Blu Tack to make a crude form of prototype. Sorry no WIP photographs as I was too busy grinding my teeth in frustration, uttering foul oaths and yelling various other forms of industrial phrases at the model. 
Internal view of the stairway
External view of stairway
Detail of small gatehouse
Using the skewers enabled me to work out the heights of the various vertical posts without wasting strips of hardwood or balsa. I won't attempt to describe how I made the stair treads fit as, to be perfectly honest looking back I'm not entirely sure how I achieved it myself and I'd have to admit it was through more luck than judgment that it worked.

The structure is held together with copious amount of PVA glue and threats of violence.
Detail of roof including mini shampoo bottle/chimney
The Welsh original - with brother for scale.
Note the particular features of this style of castle:
  • First floor entry above a battered base marked by an offset spiral stair to the upper floor,
  • Roll mouldings at the external batter,
  • Semi-circular projecting turret (on the far right of the tower).

The model with 28mm figures for scale


For quite a while I pondered about the final colour schemes for of the model. The now familiar site of timber frame buildings painted harsh contrast of black and white is largely a Victorian invention. But relocated/reconstructed medieval buildings such as ones that can be seen at the Welsh National History Museum at St Fagan's proved to be helpful reference and yes, a number of the building are indeed painted bright white as a result of whitewashing. another is painted bright red, the colour was thought to be help scare away evil spirits. In the English county of Suffolk houses are still painted pink (the colour known appropriately enough as Suffolk Pink) thought to have been originally achieved by mixing ox blood or the juice of sloe berries into the plaster. 

However the bleedin' obvious occurred to me. The name of the neighbouring Llantillois Castle, known in English as White Castle, was the give away. The castle had obviously been plastered and covered in whitewash, therefore I decided to take the easy way out and paint this model white as well. 

Now though the question of painting a model so this size white without it appearing to look like an extra large toilet roll (or a kitchen roll - if you're posh) caused me to pause and consider my options. With these model I used test pots of paint from B&Q (a large UK D.I.Y store) as there is rather a lot of surface to cover. 

Shading and weathering adds considerably to any model but you obviously can't highlight white with a lighter colour. Therefore I had to find a suitable off-white paint to cover the entire surface of the building which would enable me to finish off with a drybrush using a plain white paint to pick out the surface detail. The entire model was given a brush over with a very diluted wash of various shades of brown and sepia coloured inks.

Well its certainly been a journey (that awful phrase Z-list celebs say on the telly whenever they've been in a show, paid a lot of money not to do much and manage to lose their dignity all at the same time, 'I've been on such a wonderful journey.') but I doubt I'll ever undertake anything similar to this for a good while.

Wednesday, 19 February 2014

English Medieval Ship The Thomas, Zvezda (9038) Scale: 1/72

This is a plastic model (Code: 9038) of an English medieval ship the Thomas, a square rigged cog, from the Russian company Zvezda.
The Thomas
Although labelled as being 1/72 scale the model is quite suitable for 28mm size figures (just remember not to use the tent on the aftercastle/sterncastle).
Detail of forecastle (or fo'c'sle if you're nautical)
I'm not sure if I rigged this bit up correctly as the ropes have to bend over the woodwork to to be secured.

Detail of aftercastle
The clever design of the model enables you to make the ship either with a complete hull (plus stand) for display or as a waterline version. As I don't want to display the model and that I will eventually use this to play medieval naval battles I choose the waterline option (there are plenty of free rules available online, I have a set from WSS magazine). Funnily enough had I owned this model during my youth I'd have nagged my mom to make this with a full hull and played with it in the kitchen sink, or more probably it would have met the same fate as models of the Golden Hind, HMS Hood and the USS Constitution, none of which unfortunately survived the tidal waves caused by me sliding into the bath (I'd like to point out this wasn't recently, I was only about five years old at the time).

As alluded to in previous posts I purchased this model from Mr. Models in Birmingham just before Christmas 2012 for under £40 (available on eBay for less but I try to support local shops whenever possible) so using this as a bathroom toy wasn't really an option.

There is a very similar model on display in a museum in the capital (the London Science Museum I believe) which I recall seeing a number of years ago. This displays the Royal coat of arms of England and with the included decal set with the Zvezda kit you can replicate the same appearance with this model. Although very impressive I chose to paint the sail to look plain and weathered.
Citadel Technical paint Nihilakh Oxide used on the rudder.
Using Google (All Hail) Images to see how other people had modelled and painted up this kit, for use as a gaming piece that is, I noticed that no one had bothered to complete the rigging. As the kit is supplied complete with quite delicate blocks and pulleys I initially assumed that people were simply opting for the easier version and not bothering to complete the kit, even though it comes complete with two sets of coloured string to use for this very purpose. Curious as to why this was the case, I quickly realised why after reading the instructions.

By not rigging up the model the main mast can by pulled out of its locating hole and stored flat. Rigged up properly the mast is firmly secured in place, ideal if you plan to display the ship properly but a major pain if you want to store the model away or transport it anywhere to play with (the waterline version stands 13"(330mm) high. The kit come supplied with separate black and gold string presumably suitable for a royal vessel for use as rigging. However I've never seen rigging this colour so I looked for a more natural looking alternative. First call was my mom's sewing box. After telling me off for making a mess she handed me a reel of white string and asked me if it was any good. The only problem, she added, was that is a type of elastic (cooking?) string. I experienced an all too rare 'light bulb' moment. Fortunately I hadn't glued the mast into place but thought I could use the elastic string to secure the sail and mast to the hulk but still be able to pull the mast out of its locating hole (it needed about 1" (25mm) of vertical clearance. As you can see, and much to my surprise, it actually worked.
Before
After - Collapsed rigging
Unlike the painting the ship following the assembly instructions, which suggested painting the hull in various coloured bands, I decided to check for any references from original medieval sources. After looking at several medieval illustrations I noticed that the ships appeared to be unpainted all except for the crows-nest, which are normally shown painted red or white. This is in stark contrast to images of the later Mary Rose which always appear in illustrations to have been daubed over by eager volunteers with random tins of paint from an interior decorators closing down sale.
In the same display case in the museum mentioned earlier there was another ship with the mainsail painted to represent a ship displaying the arms of the Earl of Warwick. I've seen this replicated a number of times in model form, so I can only assume that the modellers have seen the same display, it would be a rather odd coincidence otherwise. However the model comes with shields that add to the overall decorative look and obviously can be painted to suit your own preferences.
Being a proud midlander I opted to used the basic form of the famous Beauchamp family coat of arms, one of a handful of families that could afford to have a ship like this built. This shield is painted Gules, a fess or (in plain English - red shield with a central horizontal yellow band). The Beauchamp family actually had many branches so to differentiate between themselves the various families used different devices following the same pattern, three above and three below the band. The main, most influential, family used a crosslet but birds, squares etc. were used by other branches.

Zvezda produce other similar plastic medieval ships which I hope to buy if and when I spot one.

Friday, 7 February 2014

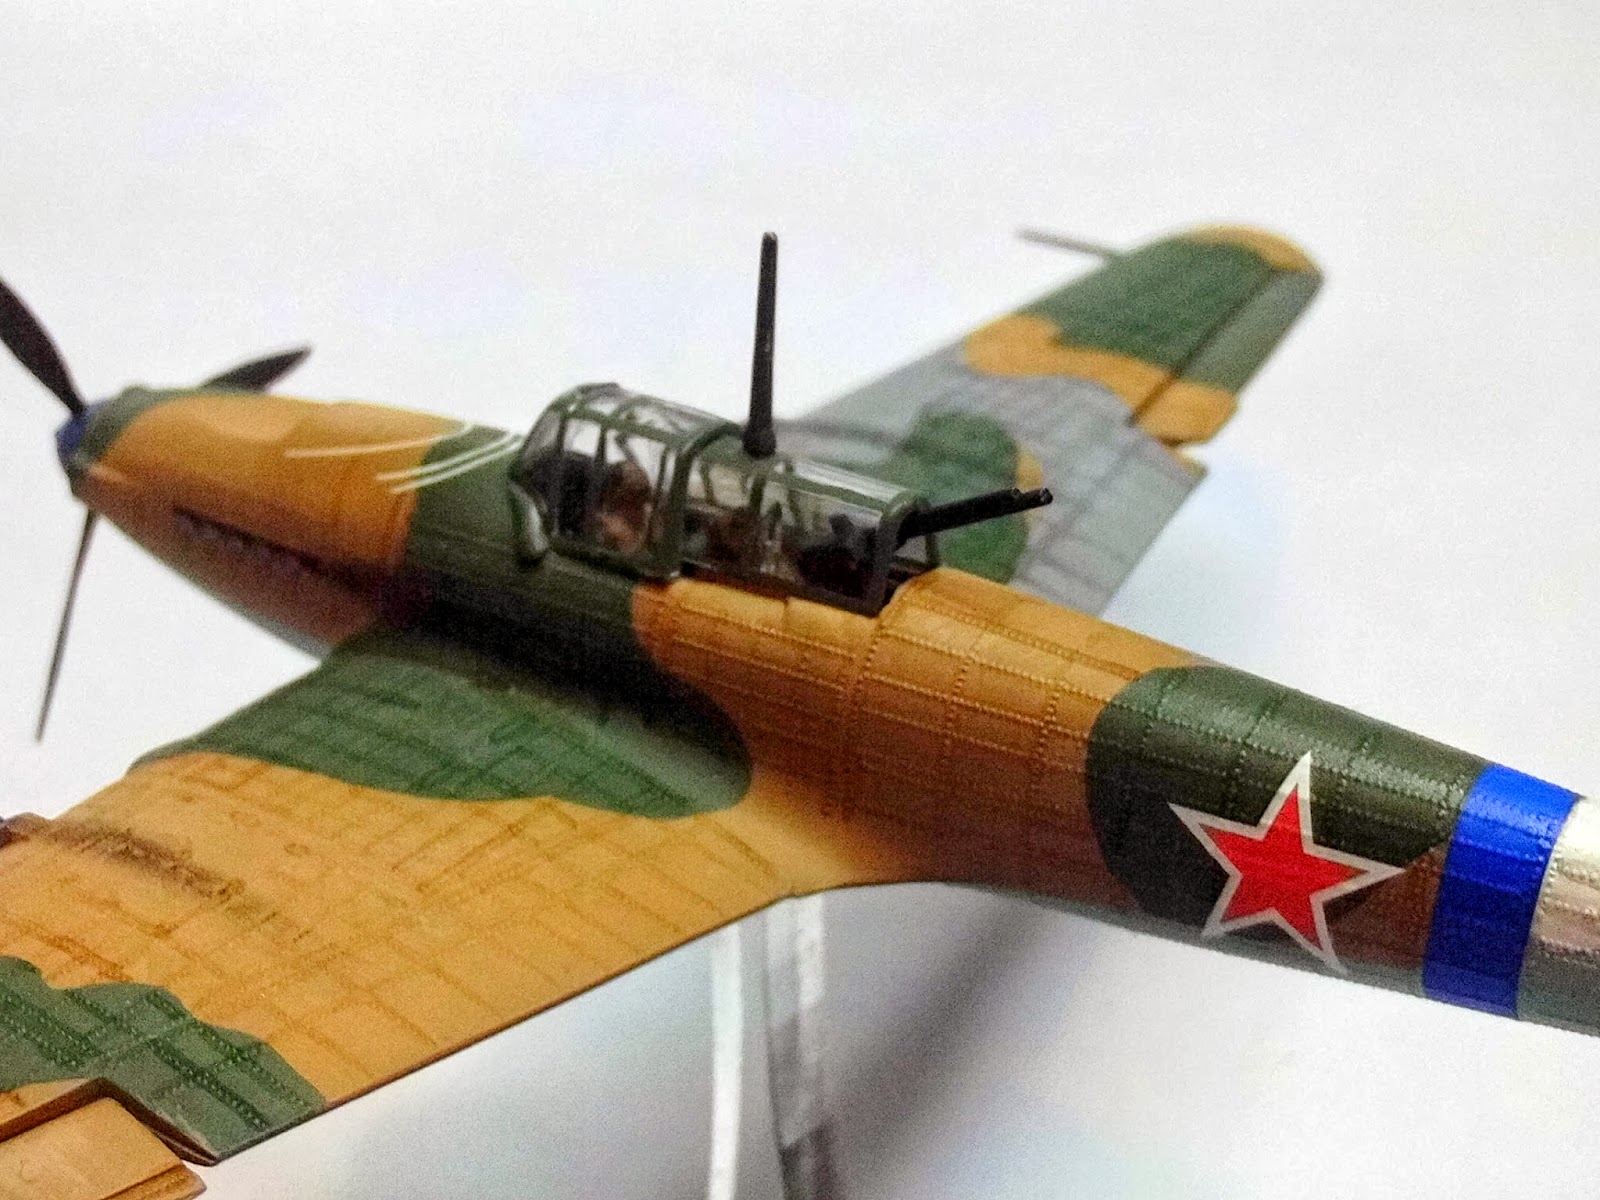
Ilyushin Sturmovik, Airfix (1/72 scale)

Ilyushin II-2M3 of the 233rd Guards Assault Regiment, VVS 1944-45.

From the instruction leaflet:
"The Ilyushin Stormovik, which first entered service in 1941, became one of the best known of all the Soviet Air Force aircraft of the Second World War. It was designed specifically for ground attack and the support of ground force in the battlefields. The Stomovik played a crucial role in World War Two and was described by Stalin as 'as necessary to the Red Army as air and bread." Over 36,000 (36,183 to be precise) Stormoviks were built - more than any other aircraft type in history.

Armament consisted of two 23mm cannon and two 7.62 machine guns in the wings and a single 12.7mm machine gun in the rear cockpit. It could carry either a bomb load of 1000lbs (450 kgs) or up to eight rockets. The IL-2M was powered by a 1770 hp Mikulin AM-38F engine giving a maximum speed of 260 mph (416 kmp). Wingspan was 47ft 10ins (14.58m) and length 38ft (11.58m)."
 

I was deliberately heavy handed with the weathering and shading on this model as I wanted it to stand out on the table.


Ironically the Sturmovik was nearly identical (in appearance and performance) to the little remembered British little bomber the Fairey Battle, still considered one of the worst wartime RAF aircraft.

Thursday, 6 February 2014

Junkers Ju87-B (Stuka), Airfix (1/72)

Junkers Ju 87R-2, 239a Squadriglia, 97° Gruppo, Italian Air Force, Lecce - Galatina, Italy April 1941.

From the instruction leaflet:
"Most famous of all the dive bombers used in the Second World War was the German Stuka or Ju87, designed by Junkers and first flown in prototype form in 1935. This unlovely but functional aircraft entered Luftwaffe service in 1937. Stukas were mainly used as close-support aircraft for the ground forces and this they did with considerable success both in the Spanish Civil War and in World War II. The Ju8B-2, one of the two versions in this kit, was built in large numbers and saw widespread service on all the war fronts, its success in the Polish and French campaigns was tempered by heavy losses during the Battle of Britain, the type being withdrawn at an early stage of the battle...Typical bomb load consisted of a single 250kg (550lb) weapon under the fuselage and up to four 50kg (110lbs) bombs on under wing racks. Armament comprised two 7.92mm MG 17 machine guns in the wings and one 7.92mm MG 15 machine gun in the rear cockpit. Powered by one 1,100hp Junkers Jumo 211 engine, the Ju87B-2 had a maximum speed of 390km/h (242mph). Wing span 13.78m (45ft 3in). Length 10.99m (36ft 1in). Height 3.76 (12ft 4in). "


Arguably the most recognisable airplane from the Second World War this model is to support my Bolt Action Italians.

Wednesday, 5 February 2014

Focke-Wulf FW189A, Airfix (1/72 scale)

Focke-Wulf FW189A
Wk.Nr.2100, 'V7+1H' of 1(H) 32 Luftwaffe, based at Pontsalenjoki, Finland May 1943

From the instruction leaflet: 
"The FW 189A reconnaissance and army co-operation aircraft was known as 'The Flying Eye' and was one of the most important and most successful Luftwaffe types, especially on the Eastern Front. In service the FW 189A completely replaced all earlier tactical reconnaissance and co-operation aircraft and was also used for light bombing missions. It proved extremely reliable and its ability to absorb punishment and defend itself made it extremely popular with its crews. When FW189 construction ended in 1944 over 800 had been built, most of which went into action on the Russian Front. Powered by two Argus 410 engines of 465 h.p. each the FW 189A-1 had a maximum speed of 217 m.p.h. and a range of 416 miles. Armament consisted of four 7.9mm machine guns and up to 440lbs of bombs. Wing span was 60ft 4 1/2ins and length 39ft 5 1/2 ins."


Plastic airplanes by Airfix were probably for most young males, of a certain age in the UK at least, the first introduction to scale modelling. I still have fond memories of walking to the local newsagent,  holding my pocket money in my sweaty little hands, to buy either an Airfix or Matchbox model. It was in fact an advert for a Tamiya scale model that rekindling my interest in modelling/painting/gaming after two decades of apathy towards my childhood hobby. Therefore this may possibly be the first model airplane I've ever actually finished properly. As a kid I rarely painted models, I just made them as quickly as possible to play with them. 
 
There's not a lot I can add to this piece really. The twin fuselages required a fair amount of filling and sanding but it is an attractive and interesting looking model.
There no real secret to painting the framework on the glass canopy apart from keeping a steady hand. It results in a far better looking model than if left simply blank. I painted the crew because they are so visable.  
I built this (and the next two models) with games of Bolt Action in mind. Although not necessary they make a nice visual marker for air attacks during play. As mentioned in the official blurb this plane saw a lot of action on the Eastern Front so it will be ideal for playing games invloving Germans, Italians against the Russians.
The stand is an acrylic base made by Ade with a small magnet attached. A corresponding magnet was then superglued to the underside of the plane (make sure you get the polarity right or it will never work). This way one base can be used for several aircraft.