Showing posts with label Buildings. Show all posts

Wednesday, 29 July 2015

Medieval Chapel, Tabletop Workshop

I received this model was a gift from a regular reader (cheers Derek) but as usual it has taken me quite a while to complete it.

This model depicts a small chapel which I feel is more appropriate to skirmish style games rather than a larger church model (said someone who made a castle great tower) and as such it will eventually form an essential focus for a scenario based on a real life event that took place in the 1432 and directly involved Lord Dudley and few of his retainers (or henchmen, it depends which side you were on).


The interior of medieval churches would often be a riot of colour as can be seen with a rebuilt medieval church such as an example at St Fagans Wales [here]. A smaller version can be found [here] but because I'm lazy I have left the interior plain.
Interior detail
Interior detail
Corner detail showing filled in location holes
Although the model is perfectly acceptable straight out of the box, regular readers probably won't be surprised that I couldn't resist altering it in some form (I was about to say 'improve' it but that's a matter of option) I wanted to give the impression that the church had been rendered and whitewashed. This is a feature rarely seen nowadays mainly because, ironically, the Victorians tended to remove it in an attempt to make the churches appear more medieval. To achieve this look I used Milliput to roughly fill in the gaps on the exterior walls but leaving just enough of the original surface detail to show though. I used Milliput rather than greenstuff because basically its the same stuff and a lot cheaper. Milliput is made from the same materials as greenstuff but has been mixed with chalk to bulk it out.

I made the model so that I could remove the roof and two walls. This was relatively easy. I initially glued two of the walls in place and then filled in the location holes that were visible from the outside. I didn't cut away any of the location pegs but I did covered the location walls on the over walls with thin pieces of greenstuff. 
Wargames Foundry Friar
shown for scale reference.
Unfortunately it appears that the manufacturer, Tabletop Workshop, no longer trades but it looks the model can still be bought online or possibly from old fashioned bricks and mortar stores if you're lucky.

Tuesday, 7 April 2015

Medieval Windmill, Scratch Built

This is my own particular take on an medieval style windmill and is loosely based on contemporary illustrations. I won't post any original images here for copyright reasons but if you use Google Images I'm sure you'll be able to find suitable pictures. I say 'loosely based' because it's a mixture of illustrations and styles I've seen and therefore will not be an entirely accurate representation of any particular image or example.
As I've stated before on similar projects this is a piece of tabletop terrain and not an item intended for display in a cabinet. I wasn't thriving to create a 100% accurate model of a windmill just my rendition of the subject to represent a mill. I made some deliberate choices that I assume to be technically incorrect but would be easier to make.

The concept of the windmill was introduced into Britain possibly at the end of 11th century (I've read this was at Dover but I can find no further reference of the claim) or more likely the mid 12th century (the idea of a windmill may come from the Middle East but this isn't known for sure). The oldest working example in the UK 'only' dates from the mid 17th century so pictorial images is all I had to work from. Watermills, on the over hand, have been around a lot longer, the Romans were operating them in England. I have a few ideas about making a model of a watermill but this is a possible future project.

The germ of the idea to make this piece was planted when I visited Avoncroft near sunny Bromsgrove, a museum that came about to preserve buildings rescued from demolition in and around the midlands. The buildings range from a substantial medieval town house up to a WWII prefab and most things in between. One of the main attractions is the windmill which I distinctly remember visiting as a young whippersnapper (many, many years ago). Although this example dates from the early 19th century one of the guides informed me that the basic design principles hadn't really changed since medieval days, they had just become bigger, more powerful and more efficient.
Avoncroft  windmill
In one of those rare moments when things just seem to go right this model was made without any pre-drawn plans (I must admit I was just plain lucky this time). With this model I used 5mm foam board (not corrugated cardboard this time. I know - last of the big spenders) that I found hidden down the side of my desk to form the main housing.
Trestle, door and steps
The base frame was made from both hardwood and balsa 6mm square section. 
The above image shows the building before I glue the base panel into place. The foam board core of the building was pegged together with cocktail sticks and glued together with PVA glue. This was clad in wooden coffee stirrers cut to represent planking.
Wooden Sail Frame
The four sails were made separately with the main spars made from barbeque sticks. The frame work of the sail was made from thin strips of hardwood. The main axle is made from 6mm (1/4") dia. wooden rod and the sails were glued into position at a slight angle like the real thing.
The roof tiles were made from cardboard, appropriately enough from a box of WotR plastic Perry Miniatures, cut into 10mm squares and glued on individually using neat PVA glue. This is not a method I'd normally use but as the area to be covered was quite small it didn't really take much time to complete.

I made the conscious decision to show the sails rolled up as the working days of a mill were relatively short, a local expert told me a miller would be lucky to operate two months out of a year (typically as I write this strong winds are blowing across England). The sails are made from small strips of tissue paper rolled tightly and super-glued into position with the sails being weaved in and out of the wooden frame (this idea came directly from seeing the mill at Avoncroft - please see photo above). Once in position I coated the tissue with PVA glue to fix it properly.

The most obvious detail missing from this model is the lack of a tail-pole, this is the long pole that would have been used to rotate the mill into the wind. After seeing an illustration in Osprey's 'The Longbow' book which also shows windmills missing this feature I decided to leave this out as well; my logic being that mills (examples built locally to me anyway) are located on the crest of hills facing towards the prevailing wind. Therefore early examples might not have needed to not been able turn into the wind. Any purists reading this can relax as I have designed (on paper at least) a far more complex and accurate model based on an early colonial American example which I will try to make whenever I get round to starting my War of 1812 project.

With hindsight I would have made this model slightly differently but I'm not going to lose any sleep over it now as this model was made pretty quickly (less than a working week allowing for various delays and overnight drying). The trestle for example would probably been buried in earth so that the windmill would appear to sit on a little mound. At least one of these mounds has been excavated in the mistaken believe that they were ancient burial grounds.

I'm not entirely sure what type of terrain I'll attempt next as I have a shed load of figures to paint but I've been looking through old photos and a picture of a well caught my eye.

Thursday, 2 April 2015

Medieval Buildings, Cardboard Scratch Build

Being reasonably happy with the results of my previous attempt at converting a papercraft model into something a little more robust (details here), I then looked out for another building to construct using similar techniques. The obvious choice was to attempt the 'Seedy townhouse No1' model seen in this previous post (here). The only tricky issue appeared to be the first floor overhang. 

Using the papermodel as a template the basic pattern was cut out of an appropriate sized piece of corrugated cardboard and then glued together, minus the roof, using PVA glue. Triangular off outs were when glued into the internal corners to add more stability to the piece and then a suitable piece of cardboard was glued into position to form the roof. 
View of front - WIP 
Left overnight to ensure the main body of the building was dry I then glued the wooden coffee stirrers into position in a suitably irregular pattern. 
View of back - WIP
The next consideration was then how to finish the roof. I had initially thought to use cardboard tiles but after the results of a previous model I decided to try the thatched option again. 


There are various options to create the look of a thatched roof, which I may try in future, but I decided to use DAS modelling clay mainly because it was readily to hand.

The clay was applied as a thick layer and scored with a cocktail stick. One particular feature I wanted to add to these models was the additional thatch that covers the apex of the roof . I had assumed it is a purely decorative feature but as I was making it I thought it might simply be to give extra protection to the most vulnerable part of the roof. I had left this feature off the storage building as I wanted to give that a more utilitarian appearance. 

A small detail I have noticed on medieval buildings (such as can be seen at Avoncroft museum) is the construction of windows. Glass was a rare and expensive feature only normally seen in well to done structures (owners would often take their glazed windows with them on their travels between homes). On normal housing window gaps were simply covered with shutters (a form of window could be made be placing a sheet of stretched material across the gap). The majority of peopled worked outside on the land so decent indoor lighting wasn't actually required anyway. The vertical window frames are often triangular in section (I bet after reading this, people will notice this small feature for themselves). To replicate this look cocktail sticks were whittled down to form a triangular section and placed in the windows. 
I initially planned on sprinkling sand to give the walls some texture and provide a surface that could be highlighted by drybrushing. Indeed I had already applied a few grains of sand to one side of one of the models and left it to dry in order to see what it looked like. However it was whilst looking through various photographs for real buildings that I realised that wattle and daub walls are generally very smooth, especially when the panels are relativity small such as seen on a small house. Therefore I decided to try and scrap off as much of the sand as possible, there are a few left on but I'm not that concerned, I really didn't want to waste time and effort removing every last grain.

One thing I did notice is that the watered down PVA glue I had used had made the corrugated cardboard wrinkle slightly but thought this was actually a bonus. The generally one dimensional surfaces and features is one aspect I don't particular like about laser cut buildings, another is that smell (that distinct whiff of burnt wood is one that I've come to associate with wargame shows - I suppose it helps mask some of the strong body odour that you sometimes walk into - the fug of war).

After seeing the result of applying watered down PVA glue to the one wall I then painted all the over surfaces to achieve a similar look. 

A quick final word on the finish of the model. Medieval buildings were probably originally painted one colour all over (i.e. the timber frames and walls). There are some striking examples in the village of Lavenham in Suffolk including a number that are painted in a colour appropriately called 'Suffolk Pink'. One method believed to have been used to create this colour was to add animal blood to the whitewash although I've also read that berries could be used (I believe the stark black and white image of timber framed timbers is largely Victorian concept). Interestingly the buildings of Lavenham only survived because the village became an economical backwater; the homeowners couldn't afford to update or improve their property so the village became a timber framed time capsule. 
Lavenham, Suffolk
Lavenham, Suffolk
Guildhall, Lavenham, Suffolk
Little Hall, Lavenham, Suffolk
Lavenham, Suffolk
These models were painted using small tester pots that are available from most from DIY stores. Almost endless supplies of relatively muted colours such as creams and browns (plus some of the more unusual colours such as the pink mentioned above) are available for only for a couple of pounds. 

Discounting the time (and effort) it takes, this type of model is very cheap to make, providing you have all the materials to hand (a tile roof version would be practically free). Although not as simple or quick to make as a papercraft model the nature of its construction makes it (I believe) a better investment of your time and effort and ultimately a more rewarding exercise. 

I don't recall seeing anyone use cardboard in this manner to create a building so if I've given anyone else the encouragement to attempt a similar project, please let me know, I'd love to see the results.

Wednesday, 1 April 2015

Seedy townhouse No1, Papercraft building

Blimey, April already! I've had an unusually busy start to the first quarter of the year (sounds scary when you put it that way) but I have also been modelling and painting so there should be a few more regular posts shortly. We also managed to have a short break in the East Midlands (more on this in later posts).

Anyway back the blog proper, following on from previous results using a papercraft model I found this model building shown here via Google Images. Probably the best quality free download I've seen so far online, this one is called the 'Seedy townhouse No1.' created by Peter Fitzpatrick.


The download can be found on the following page:

The construction is relatively straight forward although take care when making the overhang section as you have to score the paper on the reverse in order for it the fold in the proper direction. Again I made an internal frame from corrugated cardboard to give the model some rigidity.

Tuesday, 21 October 2014

Scratch-Built Thatched Storage Building

As briefly alluded to in a previous post the model detailed here was the direct result of attempting to make a paper building seen (here). After making a basic mistake with the papercraft model I was left with the basic shape of the building made from plain corrugated cardboard, I wondered if I could make it into something useful. So to start with I turned to the ubiquitous wooden coffee stirrers and clad the outside with them, following the same pattern detailed on the paper version.

Am I the only person sad enough to notice the quality of stirrers isn't as good as it used to be? The last time I mentioned this out loud (school boy error) I received an unusual look that was a mixture of scorn, pity and concern from my female companion in the coffee shop. 

Interior View of cheapo terrain
The original model had a basic printed representation of a thatched roof, so now I had the chance to try and replicate this in a more realistic fashion. I'd seen previously on the web suggestions to use DAS modelling clay. I had a 1kg block of this bought years ago from 'The Works' (a useful chain of shops in the UK that stocks cheap books and all sorts of random craft material). Having never actually used this stuff before I was curious how it would turn out.

After scoring the cardboard lightly with a craft knife (so that the clay would have something to adhere to) the clay was applied to the cardboard. Using the thick corrugated cardboard helped give the impression of the depth of real thatch. Some of the new laser cut buildings which seem very popular at the moment are supplied with teddy bear fur for the roof. This looks ok but always appears too thin to me. Real thatched roofs are at least 10" to 12" thick (in order to be waterproof), often a lot deeper, and it was this look that I wanted to reproduce.

It's useful to have a cup of water near to hand to help blend in the clay and keep it moist as you'll probably (like me) be applying relatively small portions of clay at a time. Unless you really wish to end up looking like a Chinese terracotta warrior I would highly recommend wearing rubber disposable gloves as the wet clay (or slip I suppose) can make a hell of mess of you, your clothes and your worktop. Once happy with the coverage of the roof, allowing enough time so that the clay wasn't too wet, using a cocktail stick I scored vertical lines to give the impression of the thatch itself.

Small details such as the hinge and plates where made from plastic rod and whittled down cocktail sticks were added before painting the model.

As the clay is air drying you simply have to leave it somewhere safe and allow it to set (you should notice the clay change to a slightly lighter colour). Once completely dry you can then paint the building as required. I used small tester pots of paint available from most large DIY stores.
As mentioned previously I had downloaded numerous free (you've got to love a bargain) paper buildings. These models are great but they don't withstand much handling even with reinforcing. As with the Tamiya storage hut I initially made a paper building and then wanted to make a more robust version using cheap materials that are easily available.
Completed model building
Although time consuming and obviously not quite as sturdy as laser cut or the plastic moulded buildings this type of terrain will be practically free especially if you decide to use cardboard tiles for the roof instead of modelling clay thatched version. Plus you'll have the real satisfaction of making something from scratch that you can show off on your table top.

Monday, 20 October 2014

Rustic Storage Building (Papercraft), Tamiya

During these financially tough times I try and keep an eye out for projects I can attempt that are cheap or, even better, are free. With this in mind it was whilst browsing online looking for inspiration for various types of terrain I recently happened to stumble across numerous sites devoted to papercraft buildings. Obviously these are not a new concept, indeed I have seen and played with similar pieces made by Ade during games of Bolt Action over in his Shropshire man cave. I have also in the past made various buildings from foamboard, the results of which can be seen (herehere & here) the plans and elevations of a couple which can be found (here).

There are a number of free downloads of paper terrain available off the internet but the quality can vary greatly. There are also numerous excellent models and buildings available for a small fee but I'm going to concentrate on the free stuff in this post (plus another one to follow shortly).

It was whilst browsing these various blogs and sites that I noticed an online image by Tamiya which can be found following the below link:


It caught my eye because this famous Japanese company is probably far better know as a manufacturer of high quality scale models and remote control vehicles so I was curious to know what this was. Turns out that this free-to-download paper model was actually a product to promote one of Tamiya's adhesives. 

To quote from their website: 
"This small storage building can be used as a component in 1/48 scale dioramas. Download the PDF file, print it onto thick paper, and assemble it according to the instructions below. (The model depicts a storage building similar to those which were seen on the Polish/Russian fronts in WWII.)"

Aha, ideal for both WWII Eastern Front Bolt Action games and medieval skirmish games, I thought. Now, dear reader in case you think you're reading the ramblings of an all knowing model and terrain making guru who is never makes an error please read on. 

In one of those moments when you actually learn more from making a mistake than when everything goes correctly, I had initially planned to back the paper cut out onto a piece of identically shaped corrugated cardboard (from an old shoe box) because it's cheap and readily available. However during a 'dry fit' trial run I noticed I hadn't allowed for the thickness of the cardboard so the pieces just wouldn't fit together (despite the copious amounts of swearing aimed at it). 

Rather than offset trimming the cardboard, which seemed like too much hard work, I reasoned that I could possibly make another building using the cardboard as the core of the model so put this to one side.
Crude interior
Returning to the original paper model the building is easy to cut out and construct. I used normal PVC wood glue to stick down the flaps but use extra care if you do the same. This is because the glue has a high water content and can easily affect the printed inks. A better option is probably to use something like Pritt Stick. I applied small amounts of glue using a cocktail stick taking extra care not to smudge the inks. 

Once finished I also, as suggested in the instructions, added reinforcement using offcuts from the same corrugated cardboard as used before. Ideal for the tabletop, these models are quick and easy to make although obviously not really suitable for heavy, long term use but then again if you damage the current model or need more to populate your table you can simply print out another sheet and start again.

Next up will be my attempt at creating a more substantial model based on this paper template. 

Tuesday, 24 June 2014

Medieval Bird Scarer, Stanton St. John, Oxfordshire.

This is the church of St John the Baptist Church in Stanton St. John, Oxfordshire. The church dates back to the 12th century although it been altered and added to over the passing centuries. 
St John the Baptist Church

Of particular interest in the church is a stained glass window, located on the south wall of the church, made up of several pieces of glass from various different periods. One piece displays the arms of de Clare family, perhaps most famous for building Caerphilly castle.
Arms of de Clare family
Below the Clare arms is shown the funeral of the Virgin Mary and the actions of a certain Jephonias. He attempted the overturn the coffin but became stuck fast. After a quick prayer to St Peter he was released and can be seen falling to the ground.
Bird Scarer
At the bottom of the window is a small circular piece of glass that is easily overlooked. It was only when a friendly local asked if I'd seen the 'Bird Scarer' that I went back for a closer look.


This image dates from the 14th century and is thought to depict a scene from the ' Labours of the Months' where we can see an agricultural worker engaged in the scaring off seed eating birds, probably in April during the planting season.

However, to my modern eye, armed with a sword and butler he seems quite overly equipped just to chase off any pests that are trying to eat his crops. If he is simply a humble bird scarer then I must admit he's very effective at his job, as you will notice there is a distinct lack of birds in the image.

Tuesday, 4 March 2014

Great Round Tower

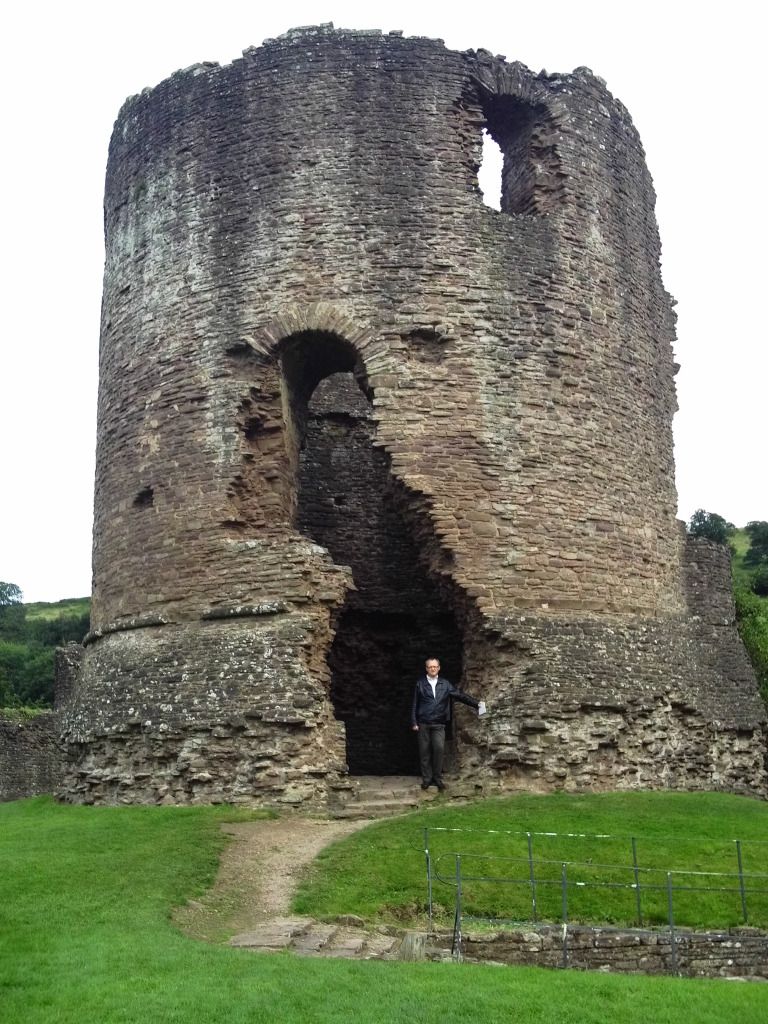
This, I'm very glad to say, is the completed model of the Great Round Tower based on the castle at Skenfrith. With expended delays it actually took just over a year to finish. In real terms it probably took about a two weeks to build but there were several times when this model was very nearly consigned to terrain heaven when I was sorely tempted to launch it into the nearby park via my size ten boot.  

Its torturous development can be followed by viewing these previous posts (click on the links for a blow by blow account).


The reason I decided not the fix the hourdings or the entrance stairway in place is a simple one. Travelling through  northern France you will often see medieval castles in a decent state of repair, for instance  the keep at Falaise which was shelled by the Allies during for WWII. It occurred to me that by making the woodwork removable the piece could then be used on the tabletop for a setting anywhere in between the 13th to the 21st century.
Hourding painting detail
If I thought the hourdings was complex, attempting the stairway and entrance was a different league. The model sat, ignored, for several months on my desk. At one stage I even moved it out of sight to avoid it causing me further annoyance. It was a trip to south Wales to see the original inspiration, Skenfrith and other nearby castles, that finally goaded me into finishing this project. Seeing illustrations and reconstructions give me a better idea of how to attempt this final part of the model, but this was still a very much a hit and miss affair. Several abortive attempts were made using bamboo barbecue skewers and Blu Tack to make a crude form of prototype. Sorry no WIP photographs as I was too busy grinding my teeth in frustration, uttering foul oaths and yelling various other forms of industrial phrases at the model. 
Internal view of the stairway
External view of stairway
Detail of small gatehouse
Using the skewers enabled me to work out the heights of the various vertical posts without wasting strips of hardwood or balsa. I won't attempt to describe how I made the stair treads fit as, to be perfectly honest looking back I'm not entirely sure how I achieved it myself and I'd have to admit it was through more luck than judgment that it worked.

The structure is held together with copious amount of PVA glue and threats of violence.
Detail of roof including mini shampoo bottle/chimney
The Welsh original - with brother for scale.
Note the particular features of this style of castle:
  • First floor entry above a battered base marked by an offset spiral stair to the upper floor,
  • Roll mouldings at the external batter,
  • Semi-circular projecting turret (on the far right of the tower).

The model with 28mm figures for scale


For quite a while I pondered about the final colour schemes for of the model. The now familiar site of timber frame buildings painted harsh contrast of black and white is largely a Victorian invention. But relocated/reconstructed medieval buildings such as ones that can be seen at the Welsh National History Museum at St Fagan's proved to be helpful reference and yes, a number of the building are indeed painted bright white as a result of whitewashing. another is painted bright red, the colour was thought to be help scare away evil spirits. In the English county of Suffolk houses are still painted pink (the colour known appropriately enough as Suffolk Pink) thought to have been originally achieved by mixing ox blood or the juice of sloe berries into the plaster. 

However the bleedin' obvious occurred to me. The name of the neighbouring Llantillois Castle, known in English as White Castle, was the give away. The castle had obviously been plastered and covered in whitewash, therefore I decided to take the easy way out and paint this model white as well. 

Now though the question of painting a model so this size white without it appearing to look like an extra large toilet roll (or a kitchen roll - if you're posh) caused me to pause and consider my options. With these model I used test pots of paint from B&Q (a large UK D.I.Y store) as there is rather a lot of surface to cover. 

Shading and weathering adds considerably to any model but you obviously can't highlight white with a lighter colour. Therefore I had to find a suitable off-white paint to cover the entire surface of the building which would enable me to finish off with a drybrush using a plain white paint to pick out the surface detail. The entire model was given a brush over with a very diluted wash of various shades of brown and sepia coloured inks.

Well its certainly been a journey (that awful phrase Z-list celebs say on the telly whenever they've been in a show, paid a lot of money not to do much and manage to lose their dignity all at the same time, 'I've been on such a wonderful journey.') but I doubt I'll ever undertake anything similar to this for a good while.