 |
| Group shot of the happy family complete with pets |
Showing posts with label Necrons. Show all posts
Showing posts with label Necrons. Show all posts
Monday, 26 March 2012
Necrons, Games Workshop - Family Protrait Part 9 of 9


Saturday, 24 March 2012
Necrons, Games Workshop - Part 8 of 9 Scarab Swarms
The first part of the Necrons project Scarab Swarms is now complete and I'm making decent progress with the main figures. Hopefully these should be finished by the end of the week (if I can stay out of the local beer garden, with all this sunshine).

These little ankle bitters were easy to paint up. Primed with black then block painted with Chainmail leaving the low areas black and then highlighted with Mithril silver. Then, using the GW washes added shadow and 'dirt' stains.


These little ankle bitters were easy to paint up. Primed with black then block painted with Chainmail leaving the low areas black and then highlighted with Mithril silver. Then, using the GW washes added shadow and 'dirt' stains.

Friday, 23 March 2012
Necrons, Games Workshop - Part 7 of 9
A couple of close up shots. Along with the ‘officer’ figure this is my favourite figure. You can tell when a figure ‘works’ or not and I think this one does. He looks menacing and there is enough tension in the piece to attract attention plus I enjoyed scratch building the side arm.

Last figure to be completed.


Last figure to be completed.


Thursday, 22 March 2012
Necrons, Games Workshop - Part 6 of 9
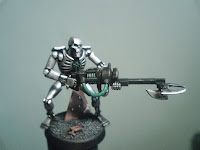
Last but not least, this is the final figure which I was 'forced' to modify. I made the left arm from spare plastic sprue.
The right hand and base of the gun was taken from a spare ACW arm. At first I made the gun in the style of a double barrel shotgun but this didn't 'look' quite right so I stuck another two barrels on top. Again this looked too basic. Seeing a circular moulding on a sprue I thought this could look like an ammo magazine case. I decided to place the case on top to look like an old Gatling gun rather than underneath like a Thompson sub-machine gun.


This set is now more or less complete. The only thing left now is to fit the green plasma barrels and finish with a protective varnish.
The right hand and base of the gun was taken from a spare ACW arm. At first I made the gun in the style of a double barrel shotgun but this didn't 'look' quite right so I stuck another two barrels on top. Again this looked too basic. Seeing a circular moulding on a sprue I thought this could look like an ammo magazine case. I decided to place the case on top to look like an old Gatling gun rather than underneath like a Thompson sub-machine gun.


This set is now more or less complete. The only thing left now is to fit the green plasma barrels and finish with a protective varnish.
Wednesday, 21 March 2012
Necrons, Games Workshop - Part 5 of 9
Thinking that I’d very nearly completed painting and constructing the Necron figures (see below), I was a bit taken aback when I realised that there was an arm missing. Well two really. One that I’d used to create a modification by cutting off a hand to use on another figure and the other arm went missing after I’d dropped my parts box. Ho hum. This means that I will have to cut and carve another right hand. I’ve found a spare set of plastic arms (holding a musket) from a Perry ACW mini that I think I can use.



Tuesday, 20 March 2012
Necrons, Games Workshop - Part 4 of 9
In order to create an effect of a plasma gun GW provide twelve plastic rods (that appear florescent green) rods which form the barrow of the weapon. Several of these rods split when I was removing them from the various sprues. One broke clean in two and looking awful when I super-glued it back together. Slightly depressed and not knowing what to do as an alternative, I stared at the sprue for a few minutes. Then I noticed that one long side of the spruce was free from markings so I cut a section out and thinned it down to match the others. Surprisingly the plastic didn’t look too bad. It then occurred to me that I may be able to use the same material to create a light-sabre type weapon to replace the sword I had planned for another figure. First I removed the hand and handle from one plasma gun and then made a pistol from various different square and round section plastic rods.
A replacement handle was cut out from plastic card. To achieve the correct look with the plasma gun for the light sabre figure I simply cut away the right hand and hollowed out the handle.

A replacement handle was cut out from plastic card. To achieve the correct look with the plasma gun for the light sabre figure I simply cut away the right hand and hollowed out the handle.
Monday, 19 March 2012
Necrons, Games Workshop - Part 3 of 9
I mocked up one model to represent an officer figure. I have to work on the right arm and tweak the hand of the left arm (to make it left handed!). I might replace the sword with a light-sabre type weapon.


Looks a bit like Eddie of an Iron Maiden album cover.


Looks a bit like Eddie of an Iron Maiden album cover.
Friday, 16 March 2012
Necrons, Games Workshop - Part 2 of 9
To make this figure stand out a bit more I've altered the pose slightly. The left leg has been cut at the hip and the knee and then pinned at a different angle to enable the foot to rest on the block. I may reverse the arm holding the weapon from right to left so the arm is resting on the knee.


Another more obvious addition will be to add a couple of extra blades to the end of the weapon; a Gauss Flayer apparently.


Another more obvious addition will be to add a couple of extra blades to the end of the weapon; a Gauss Flayer apparently.


Thursday, 15 March 2012
Necrons, Games Workshop - Part 1 of 9
In my youth I would often see how quickly I could complete a model, the faster the better I thought. Nowadays I spend a bit more time planning ahead. Some of this is simply mentally picturing how to complete the minis, a mental dry run. Without wishing to sound odd I can often ‘see’ the finished article before I start, or at least have a very good idea how it will look. It’s a pity I can’t rapid prototype using my mind power alone.


An example of this process is the Necron miniature bases. From the start I had wanted to give the notion of the Necrons walking across a scarred industrial wasteland. I had assumed that all of the miniatures were made up of identical parts until I came to prepare the bases. Checking the figures again I was pleasantly surprised to discovery that there is a large amount of variation possible. With several arm options and separate bodies every model can have a different pose.


An example of this process is the Necron miniature bases. From the start I had wanted to give the notion of the Necrons walking across a scarred industrial wasteland. I had assumed that all of the miniatures were made up of identical parts until I came to prepare the bases. Checking the figures again I was pleasantly surprised to discovery that there is a large amount of variation possible. With several arm options and separate bodies every model can have a different pose.


Raiding the scrap box enabled me to produce a number of special ‘one off’ bases. The figure standing on the crushed and twisted structural steel section is a good example. This was made from standard plastic ‘H’ section heated over a candle and then flattened into shape with a metal needle file. Interesting odd shaped bits of plastic were used to replicate distressed metal. Using thin plastic rod I cut half a dozen small pieces to equal length and then scattered them to replicate spent shell cases. Small scale metal chain and plastic card complete with 'bullet holes' and rust stains will add to the overall look of desolation. Reminds me of a foundry I worked in once.

One criticism I have of this box set is that the bases supplied are way too small for these figures (20mm dia). Or to be more pedantic, the legs of the figures are too widely spaced. If one foot is placed firmly within the circular base then the other foot almost entirely clears the edge. Both feet will overhang the edge if not positioned carefully leaving, in my opinion, not enough contact to secure them properly. In order to be safe I decided to pin all of them. This is a relatively easy, if a little long winded, procedure and gives the mini a little extra stability. I used a hand drill to produce a small blind hole, the same diameter as a paper-clip, into the ‘foot’ of the miniature. Then cut off a suitable length of paper clip. Bend the metal into a loop with a longer length of metal at ninety degrees to the loop, pass this though the plastic base and glue the miniature into position.
Subscribe to:
Posts (Atom)