Showing posts with label WWII. Show all posts

Friday, 12 December 2014

Drakelow Tunnels - WWII shadow factory & Nuclear Bunker

Usually the vast majority of people associate the Black Country with a grim industrial landscape which is understandable, there has been heavy industrial activity associated with the area practically nonstop since the early 17th century. However drive for a few miles towards the south west and you will find some of the most attractive quintessential countryside of the English midlands. Such a place is the area around Kinver, South Staffordshire which I always associate with happy childhood memories. 
Main Entrance to Drakelow Tunnels
The chosen few - Women, children and fat, bald blokes called Matthew first!
The reason for this is because way back in my youth on a typical Sunday afternoon my older brother and myself were often taken on long country walks by our parents (I now suspect this was to wear us out after we had consumed unhealthy amounts of sweets and fizzy pop over the weekend). Here we would charge with reckless abandon around the remains of the impressive iron age fort and a rundown concrete pillbox creating merry hell, reenacting battle scenes from whichever war film we had recently seen on the telly. Even as a child I often wondered why there was a pillbox, located there for no obvious reason, slap bang right in the middle of the countryside. 

I had no idea that almost literally underneath my feet was a secret WWII factory and a genuine nuclear bunker. Three and half miles of tunnels were dug out the living rock. It was only within the last year or so that I knew of its existence. 
Main access tunnel

After the heavy bombing in 1940 of Coventry and in particular the destruction of a Rover factory that supplied engine parts for the Bristol Aeroplane Company, the Government realised it needed a safer local option to supply factories in Acocks Green and Solihull. It was decided to create a series of tunnels that would be difficult to spot from the air and more importantly would be relatively safe from bombing.
WWII kitchen
WWII kitchen - deep fat fryer (chips!)
WWII graffiti
After the war the site was used as a military storage area. During the Cold War a smaller section of the tunnels were converted into a nuclear bunker that would cover the southern midlands area, complete with communication equipment, several blast doors and decontamination areas. The site was eventually decommissioned by the Government in the early 1990's.

A full history of the site can be found on the following sites: 


Wandering around I noticed that several of the walls appeared to have been vandalised by someone with a sledgehammer, however I later read that recently the police had discovered a large illegal drug factory within the tunnels so the damage was probably the result of the police raid. 

The site reminded me of Mimoyecques (the relatively little know V3 cannon site for one of Hilter's planned vengeance weapons which could have obliterated London) and the WWI forts in the Verdun area. The equipment within the structure gives the place a quite eerie atmosphere. 

I certainly wouldn't like to be stuck down there overnight, some of the rooms seemed to have come straight out a horror video game. 
Original site GPO teleprinter
Toilets
Communication equipment
Toilet block
Decontamination area complete with shower.
The intention is to eventually open the tunnels as a museum, until then the volunteers that look after the tunnels hold regular open days, details of which can be found their Facebook page. If you have the opportunity to visit then I would strongly recommend that you do. 


You may notice on the Facebook page my brother managed to get himself onto several photographs. 
Entrance & exit - original blast doors

Tuesday, 21 October 2014

Scratch-Built Thatched Storage Building

As briefly alluded to in a previous post the model detailed here was the direct result of attempting to make a paper building seen (here). After making a basic mistake with the papercraft model I was left with the basic shape of the building made from plain corrugated cardboard, I wondered if I could make it into something useful. So to start with I turned to the ubiquitous wooden coffee stirrers and clad the outside with them, following the same pattern detailed on the paper version.

Am I the only person sad enough to notice the quality of stirrers isn't as good as it used to be? The last time I mentioned this out loud (school boy error) I received an unusual look that was a mixture of scorn, pity and concern from my female companion in the coffee shop. 

Interior View of cheapo terrain
The original model had a basic printed representation of a thatched roof, so now I had the chance to try and replicate this in a more realistic fashion. I'd seen previously on the web suggestions to use DAS modelling clay. I had a 1kg block of this bought years ago from 'The Works' (a useful chain of shops in the UK that stocks cheap books and all sorts of random craft material). Having never actually used this stuff before I was curious how it would turn out.

After scoring the cardboard lightly with a craft knife (so that the clay would have something to adhere to) the clay was applied to the cardboard. Using the thick corrugated cardboard helped give the impression of the depth of real thatch. Some of the new laser cut buildings which seem very popular at the moment are supplied with teddy bear fur for the roof. This looks ok but always appears too thin to me. Real thatched roofs are at least 10" to 12" thick (in order to be waterproof), often a lot deeper, and it was this look that I wanted to reproduce.

It's useful to have a cup of water near to hand to help blend in the clay and keep it moist as you'll probably (like me) be applying relatively small portions of clay at a time. Unless you really wish to end up looking like a Chinese terracotta warrior I would highly recommend wearing rubber disposable gloves as the wet clay (or slip I suppose) can make a hell of mess of you, your clothes and your worktop. Once happy with the coverage of the roof, allowing enough time so that the clay wasn't too wet, using a cocktail stick I scored vertical lines to give the impression of the thatch itself.

Small details such as the hinge and plates where made from plastic rod and whittled down cocktail sticks were added before painting the model.

As the clay is air drying you simply have to leave it somewhere safe and allow it to set (you should notice the clay change to a slightly lighter colour). Once completely dry you can then paint the building as required. I used small tester pots of paint available from most large DIY stores.
As mentioned previously I had downloaded numerous free (you've got to love a bargain) paper buildings. These models are great but they don't withstand much handling even with reinforcing. As with the Tamiya storage hut I initially made a paper building and then wanted to make a more robust version using cheap materials that are easily available.
Completed model building
Although time consuming and obviously not quite as sturdy as laser cut or the plastic moulded buildings this type of terrain will be practically free especially if you decide to use cardboard tiles for the roof instead of modelling clay thatched version. Plus you'll have the real satisfaction of making something from scratch that you can show off on your table top.

Monday, 20 October 2014

Rustic Storage Building (Papercraft), Tamiya

During these financially tough times I try and keep an eye out for projects I can attempt that are cheap or, even better, are free. With this in mind it was whilst browsing online looking for inspiration for various types of terrain I recently happened to stumble across numerous sites devoted to papercraft buildings. Obviously these are not a new concept, indeed I have seen and played with similar pieces made by Ade during games of Bolt Action over in his Shropshire man cave. I have also in the past made various buildings from foamboard, the results of which can be seen (herehere & here) the plans and elevations of a couple which can be found (here).

There are a number of free downloads of paper terrain available off the internet but the quality can vary greatly. There are also numerous excellent models and buildings available for a small fee but I'm going to concentrate on the free stuff in this post (plus another one to follow shortly).

It was whilst browsing these various blogs and sites that I noticed an online image by Tamiya which can be found following the below link:


It caught my eye because this famous Japanese company is probably far better know as a manufacturer of high quality scale models and remote control vehicles so I was curious to know what this was. Turns out that this free-to-download paper model was actually a product to promote one of Tamiya's adhesives. 

To quote from their website: 
"This small storage building can be used as a component in 1/48 scale dioramas. Download the PDF file, print it onto thick paper, and assemble it according to the instructions below. (The model depicts a storage building similar to those which were seen on the Polish/Russian fronts in WWII.)"

Aha, ideal for both WWII Eastern Front Bolt Action games and medieval skirmish games, I thought. Now, dear reader in case you think you're reading the ramblings of an all knowing model and terrain making guru who is never makes an error please read on. 

In one of those moments when you actually learn more from making a mistake than when everything goes correctly, I had initially planned to back the paper cut out onto a piece of identically shaped corrugated cardboard (from an old shoe box) because it's cheap and readily available. However during a 'dry fit' trial run I noticed I hadn't allowed for the thickness of the cardboard so the pieces just wouldn't fit together (despite the copious amounts of swearing aimed at it). 

Rather than offset trimming the cardboard, which seemed like too much hard work, I reasoned that I could possibly make another building using the cardboard as the core of the model so put this to one side.
Crude interior
Returning to the original paper model the building is easy to cut out and construct. I used normal PVC wood glue to stick down the flaps but use extra care if you do the same. This is because the glue has a high water content and can easily affect the printed inks. A better option is probably to use something like Pritt Stick. I applied small amounts of glue using a cocktail stick taking extra care not to smudge the inks. 

Once finished I also, as suggested in the instructions, added reinforcement using offcuts from the same corrugated cardboard as used before. Ideal for the tabletop, these models are quick and easy to make although obviously not really suitable for heavy, long term use but then again if you damage the current model or need more to populate your table you can simply print out another sheet and start again.

Next up will be my attempt at creating a more substantial model based on this paper template. 

Tuesday, 14 October 2014

Dad's Army - Home Guard Platoon - Bolt Action Unboxing

Arguably one of the most 'British' of all television series (and soon to be a film) Dad's Army is brought to miniature life in this Warlord Games box set. Ade provides a quick review:

Thursday, 7 August 2014

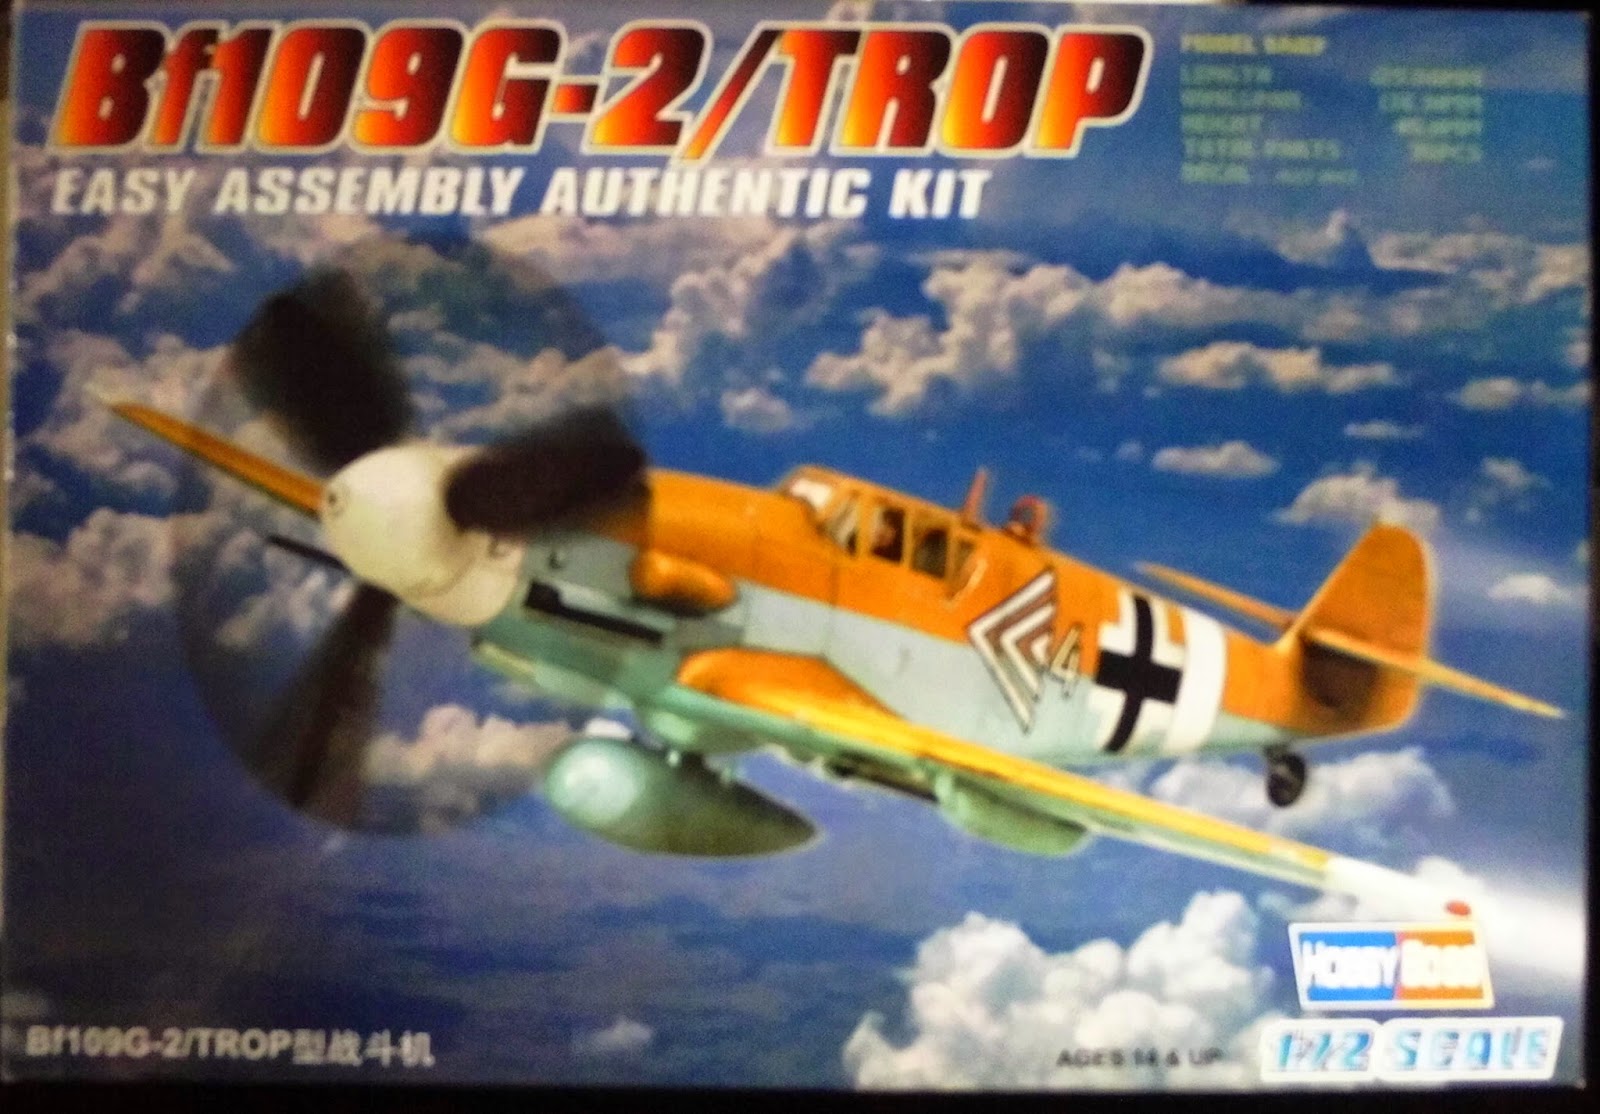
Messerschmitt Bf109G-2 Trop, Hobby Boss (1/72 scale)

As one of my (many) current projects is creating a DAK force for Bolt Action when I spotted this kit in a local model shop I thought it would be a welcome addition to my small force. I've since spotted a pre-painted version of the same model during a scale model show so it's worth keeping a eye out for it.
Box Art
Using the power of Google I found that someone had posted that these markings represent Bf 109G-4/Trop 'White Triple Chevron 4', flown by Hauptmann Gustav Rodel, Gruppenkommandeur Il./JG 27, April 1943, although there is some discussion that the colour details are incorrect but seeing as I known nothing about the subject I won't comment. 
Although obsolete by the end of the war the Bf109 was the main workhorse of the German Luftwaffe. Over 33,000 were made, second only in numbers to the Russian Sturmovik - a model of which can be seen (here).
The kit itself is quite basic (although not as basic as the Grafix models) and easy to assemble. The box art is slightly misleading as there is no pilot figure and you only have the option of the landing gear being down. There is also very little cockpit detail but as I wanted to use this simply as a playing piece to match my other airplanes for Bolt Action I wasn't overly concerned about these points. 

A small magnet was superglued to the underside of the fuselage so that the model can to fixed to 'flying' base (see photo). To help give the impression that the plane is flying I remodelled the landing quite up. This is was quite crude but it will hardly ever been seen especially as the planes are only really supposed to be seen in plan view.  
Landing gear up 
The quote from the HobbyBoss website the armament spec of the Bf109 (replacing the most obvious typos) was:
"Standard armament was the engine mounted 20MM MG 151/20 cannon with 200 rounds and a pair of cowl-mounted 7.9MG 17 machine guns with 500 rounds per gun. This could be supplemented by Rustsatze 6, a pair of MG 151/20 cannons in under wing gondolas."

I fixed the canopy of the model in place without a pilot as at 1/72 scale you don't tend to notice that the pilot is missing, especially as the canopy of the 109 was notoriously small. 
Interesting decal options
One final point about this model is that the Chinese manufacturer has included the option to add a decal of a swastika to tailfin, although this isn't immediately obvious. The decal comes in two separate parts so you have to overlay one over the other to make the pattern. I assume this is allow the model to be sold in the German/Austrian market where any depiction of the symbol is illegal (which is perfectly understandable). Even posting images online such as on the Lead Adventures forum (which I believe is based in Germany) can give them serious legal issues.

Although this may seem a contradiction, seeing as I won't purchase miniatures depicting SS soldiers (this is obviously my own personal choice) I do prefer to have the option of modelling a model correctly in the same way I will paint a hammer and sickle on a flag for use with my Soviet forces.

Below are photos from RAF Museum Hendon of their own airtime Messerschmitt Bf109G-2/TROP W/NR.10639 - `Black 6'/RN228/8478M/G-USTV.


Wednesday, 30 July 2014

WWII American Warplane (Mustang), Grafix

I picked up this particular model from The Works, a well known store here in the UK but perhaps best know for selling discount books, for the bargain price of 99 pence. Occasionally if you have a rummage about you can find something of interest. They are also currently stocking Revell's - Mistel V Ta154 And Fw190 kit for an absolute bargain £20.
Miss Yelma
The model itself is based on the famous WWII American fighter the North American Mustang.
Box Art (and a bargain)
As you will see from my (now traditionally very poor) photos the kit is very basic, in fact the entire model consists of a grand total of ten parts. I'm guessing the model is built to approximately 1/72 scale although there is no mention of this anywhere on the box or on the instruction sheet (although why anyone would need instructions is a puzzle as the parts will only fit together in one way).
1st sprue
2nd sprue
Strange 3D decals
Using the powers of Google All Hail' Images I was able to find the actual plane the cover art was based on (the North American TF-51D Mustang 44-84847, Miss Velma, (N251RJ) to be precise).

As with the plastic cowboys this kit was bought on impulse (well, it was only a pound) and which I had only bought out of curiosity to use it as a desk ornament. However after making the kit I wondered if I could paint the model to a reasonable standard to enable me to use it in Bolt Action games along side my other 'proper' models i.e. ones made by Airfix and Revell.

As I had already glued the wheels/landing gear in place, in order to match the other Bolt Action planes, I removed the wheels with side cutters and superglued a small magnet to the underside of the model. As the mould line ran straight down the middle of the cockpit I applied liquid poly cement to the join and then sanded it down. I repeated this a number of times until I was happy with the result. 

After taking a look at the oddly designed decals, I decided to hand paint my own onto the plane as the originals are drawn in a 3D style complete with added shadow detail. Very odd as it's easier to produce a flat (and more accurate) pattern. The green & yellow checker pattern, the yellow 'go-faster strip' and the invasion strips were also painted by hand.
Completed hand-painted model
Again I'm not sure that the amount of time and effort that went into painting the kit was actually worth it in terms of the finished result but it was quite an enjoyable challenge.

Tuesday, 22 July 2014

Changing the Pose of a Miniature - Modding - Bolt Action

Here's a quick video that shows how to quickly and easily modify a plastic figure, in this case a miniature from the Perry's DAK box set.

Friday, 30 May 2014

Marder III M (German Tank Destroyer) - 1/48 scale, Tamiya

This model of the Marder III M (German Tank Destroyer) was given to me by Ade as part of our ongoing Bolt Action desert project. Although the kit is 1/48 scale it is visually close enough to suit 28mm range of figures (which is generally quoted as being 1/56 scale).

From the Tamiya instruction sheet:

"During WWII, Germany produced many open-topped tank destroyers using the chassis of obsolete tanks. Among these was the Marder III series, which was based on the 38(t) tank made by the Czech company CKD (later BMM) and developed to counter Russian T-34 and KV-1 tanks."

As far as I know this type of tank destroyer didn't actually serve in north Africa but according to the info sheet the Marder III Ausf.M were painted in overall Dark Yellow, individual units then applied their own Red Brown and Dark Green camouflage patterns over the base colour to match local conditions. This particular model is finished with decals are for that of the '1st Company 348th Tank Destroyer Battalion, 348 Infantry Division, Belgium Spring 1944' and was painted in a simple two tone shade of yellow/sand. My logic was that I use this model in European or desert scenarios and it wouldn't look to out of place although I find it odd though that a unit serving in Belgium would opt for a simple dark yellow camouflage.

This model has been made as a gaming piece and not a military modelling display item. For instance I've left off certain items (I'm not telling you which bits though) but the initial idea was to paint and finish it as an example of simple weathering techniques. I videoed this process using various different methods to show how relatively simple is to produce half decent looking results. One technique I've never tried before was 'salt weathering' technique which is to use salt grains (I used model railway ballast as well) to produce a look of chipped paint. Another technique used was to apply weathering powers which achieves the look I always wondered about whenever I looked through military model magazines.
Note shiny exhaust. The black dots are actually a decal, something I only
noticed I had missed off after the model was finished (hence lack of matt varnish.)


The final video(s) will hopefully eventually feature on Ade's channel Wargaming For Fun.

On Monday I'll be announcing the start of a special giveaway/competition type thingy with a special prize for one lucky follower, so make sure you pop over to have a look (I know, I'm such a tease).

Friday, 7 February 2014

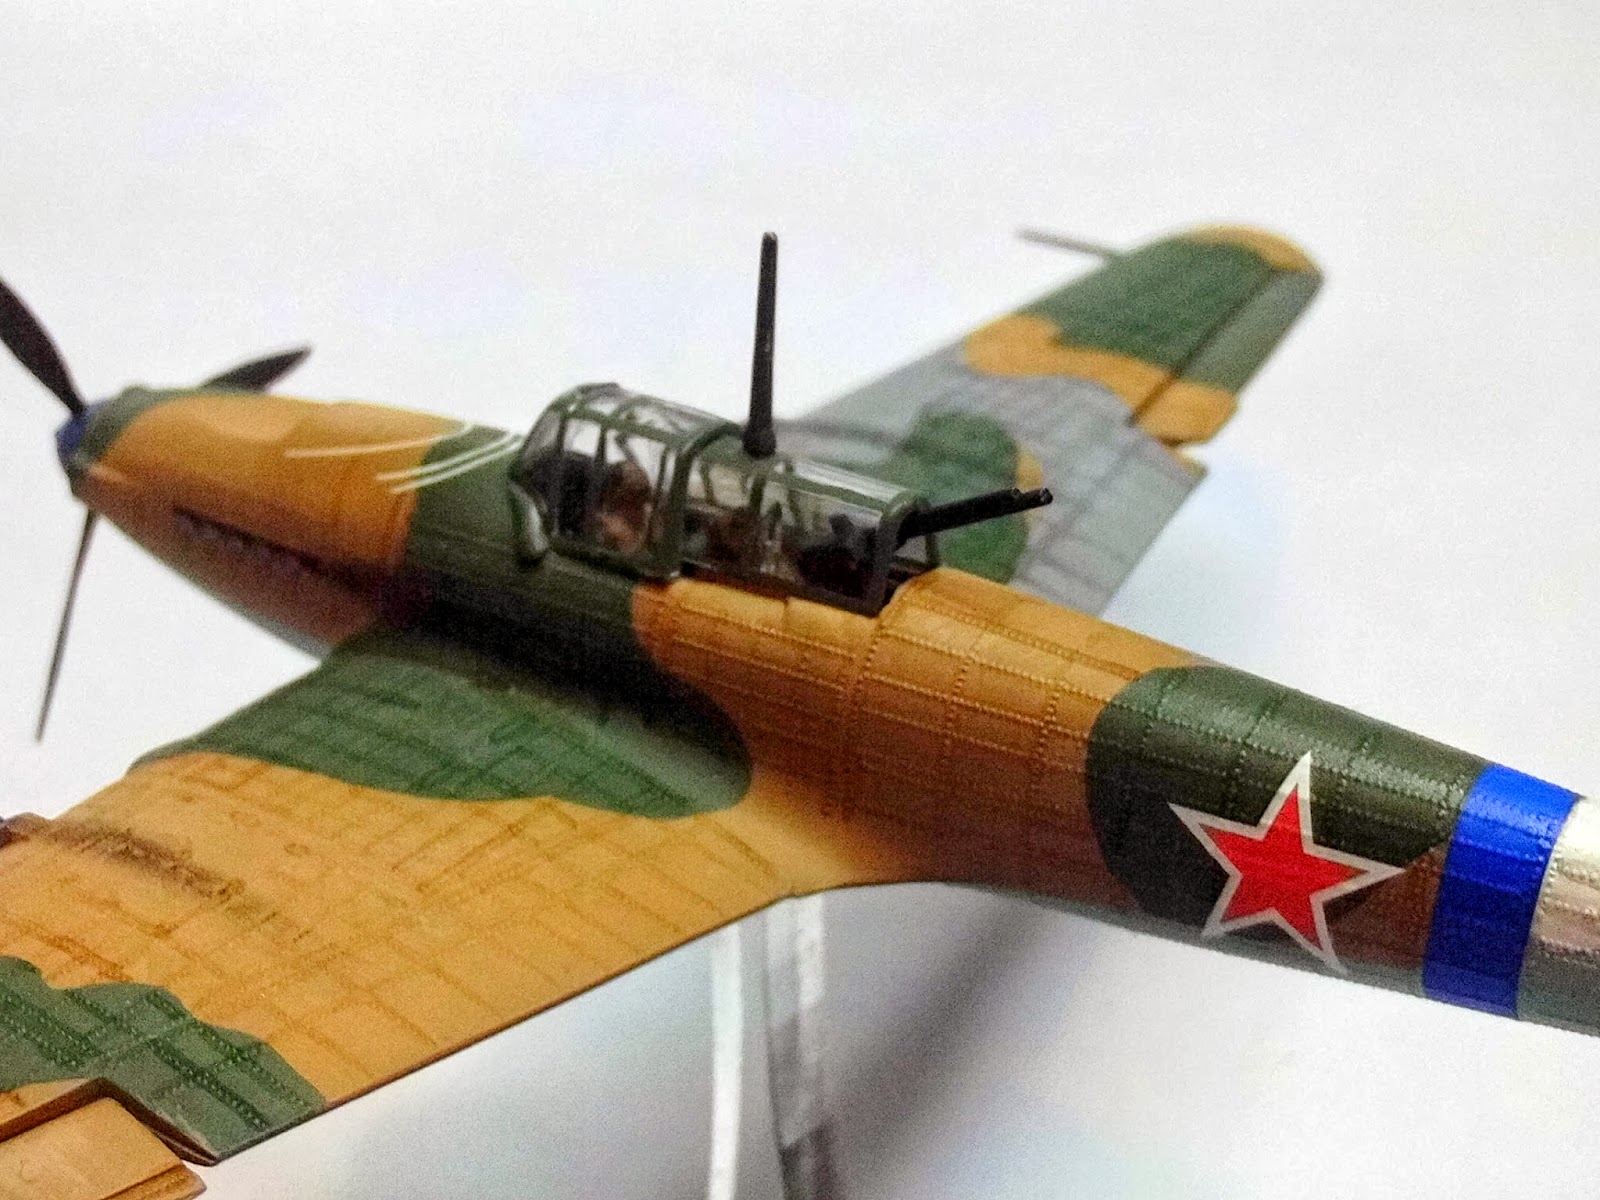
Ilyushin Sturmovik, Airfix (1/72 scale)

Ilyushin II-2M3 of the 233rd Guards Assault Regiment, VVS 1944-45.

From the instruction leaflet:
"The Ilyushin Stormovik, which first entered service in 1941, became one of the best known of all the Soviet Air Force aircraft of the Second World War. It was designed specifically for ground attack and the support of ground force in the battlefields. The Stomovik played a crucial role in World War Two and was described by Stalin as 'as necessary to the Red Army as air and bread." Over 36,000 (36,183 to be precise) Stormoviks were built - more than any other aircraft type in history.

Armament consisted of two 23mm cannon and two 7.62 machine guns in the wings and a single 12.7mm machine gun in the rear cockpit. It could carry either a bomb load of 1000lbs (450 kgs) or up to eight rockets. The IL-2M was powered by a 1770 hp Mikulin AM-38F engine giving a maximum speed of 260 mph (416 kmp). Wingspan was 47ft 10ins (14.58m) and length 38ft (11.58m)."
 

I was deliberately heavy handed with the weathering and shading on this model as I wanted it to stand out on the table.


Ironically the Sturmovik was nearly identical (in appearance and performance) to the little remembered British little bomber the Fairey Battle, still considered one of the worst wartime RAF aircraft.

Thursday, 6 February 2014

Junkers Ju87-B (Stuka), Airfix (1/72)

Junkers Ju 87R-2, 239a Squadriglia, 97° Gruppo, Italian Air Force, Lecce - Galatina, Italy April 1941.

From the instruction leaflet:
"Most famous of all the dive bombers used in the Second World War was the German Stuka or Ju87, designed by Junkers and first flown in prototype form in 1935. This unlovely but functional aircraft entered Luftwaffe service in 1937. Stukas were mainly used as close-support aircraft for the ground forces and this they did with considerable success both in the Spanish Civil War and in World War II. The Ju8B-2, one of the two versions in this kit, was built in large numbers and saw widespread service on all the war fronts, its success in the Polish and French campaigns was tempered by heavy losses during the Battle of Britain, the type being withdrawn at an early stage of the battle...Typical bomb load consisted of a single 250kg (550lb) weapon under the fuselage and up to four 50kg (110lbs) bombs on under wing racks. Armament comprised two 7.92mm MG 17 machine guns in the wings and one 7.92mm MG 15 machine gun in the rear cockpit. Powered by one 1,100hp Junkers Jumo 211 engine, the Ju87B-2 had a maximum speed of 390km/h (242mph). Wing span 13.78m (45ft 3in). Length 10.99m (36ft 1in). Height 3.76 (12ft 4in). "


Arguably the most recognisable airplane from the Second World War this model is to support my Bolt Action Italians.

Wednesday, 5 February 2014

Focke-Wulf FW189A, Airfix (1/72 scale)

Focke-Wulf FW189A
Wk.Nr.2100, 'V7+1H' of 1(H) 32 Luftwaffe, based at Pontsalenjoki, Finland May 1943

From the instruction leaflet: 
"The FW 189A reconnaissance and army co-operation aircraft was known as 'The Flying Eye' and was one of the most important and most successful Luftwaffe types, especially on the Eastern Front. In service the FW 189A completely replaced all earlier tactical reconnaissance and co-operation aircraft and was also used for light bombing missions. It proved extremely reliable and its ability to absorb punishment and defend itself made it extremely popular with its crews. When FW189 construction ended in 1944 over 800 had been built, most of which went into action on the Russian Front. Powered by two Argus 410 engines of 465 h.p. each the FW 189A-1 had a maximum speed of 217 m.p.h. and a range of 416 miles. Armament consisted of four 7.9mm machine guns and up to 440lbs of bombs. Wing span was 60ft 4 1/2ins and length 39ft 5 1/2 ins."


Plastic airplanes by Airfix were probably for most young males, of a certain age in the UK at least, the first introduction to scale modelling. I still have fond memories of walking to the local newsagent,  holding my pocket money in my sweaty little hands, to buy either an Airfix or Matchbox model. It was in fact an advert for a Tamiya scale model that rekindling my interest in modelling/painting/gaming after two decades of apathy towards my childhood hobby. Therefore this may possibly be the first model airplane I've ever actually finished properly. As a kid I rarely painted models, I just made them as quickly as possible to play with them. 
 
There's not a lot I can add to this piece really. The twin fuselages required a fair amount of filling and sanding but it is an attractive and interesting looking model.
There no real secret to painting the framework on the glass canopy apart from keeping a steady hand. It results in a far better looking model than if left simply blank. I painted the crew because they are so visable.  
I built this (and the next two models) with games of Bolt Action in mind. Although not necessary they make a nice visual marker for air attacks during play. As mentioned in the official blurb this plane saw a lot of action on the Eastern Front so it will be ideal for playing games invloving Germans, Italians against the Russians.
The stand is an acrylic base made by Ade with a small magnet attached. A corresponding magnet was then superglued to the underside of the plane (make sure you get the polarity right or it will never work). This way one base can be used for several aircraft.