Showing posts with label Games Workshop. Show all posts

Monday, 11 January 2016

Skeletons, Games Workshop

My brother spotted these figures in a local toy shop, suggesting that they could be used for Dragon Rampant. I'm assuming these are relatively old as I can't find any reference to just plain old skeletons from Games Workshop anymore. There are only five models but from what I've read the game doesn't always require six and twelve models per unit. I have a few Mantic skeletons which may be useful to bolster this unit. 
Front View
Rear View
Box Art
Sprue front detail
Sprue Rear Detail
Unusually for a Games Workshop product there are no alternative head or weapon options available. You only get enough to make five skeletons armed with spears and shields and no head options.
I wanted to give the impression that these skeletons could have existed for centuries. To achieve this I added the rust and verdigris effects more generously than I would normally. 

With the film 'Jason and the Argonauts' firmly in mind I may buy a few ancient Greek hoplites for these to spare against, but that's another project for another day.

Tuesday, 28 August 2012

Trebuchet - Part 1 of 2

This small model trebuchet detailed in these two posts was made as a direct result of a very frustrating encounter with an awful 'Finecast' version from Games Workshop. I may give a blow by blow account in a future post if I can ever be bothered to finish it. The parts are currently lying in a pile, bent and broken, somewhere in a storage box.  I did nevertheless manage to divert a complete disaster by using the resin kit as a template to create the one detailed in this post and which will explain why it looks similar.

The base of the not exactly FineCast (?) GW version,
the less said about it, the better.
Anyway back to my version. This model has been made mainly from balsa, with hardwood round dowel, plastic sprue, copper wire, wooden coffee stirrers and model chain for the various detailing. 
All new and improved WIP hand-built balsa version,
note the original location of the winch. 
As I've just mentioned I used the original individual model parts from the GW model as a initial guide for the main framework. I used lapjoints wherever the beams crossed each other, which were easy to make with balsa. For the main throwing arm/beam I used a hardwood dowel as I thought balsa wouldn't have enough linear strength. I gradually dry-fitted the components piece by piece until I was assured that all the parts went together correctly before they were glued in place.
On my command, unleash the Werther's Originals .. sorry, I meant... 'Unleash Hell!'

As I wanted to add a slide for the stone balls, a feature seen in medieval illustrations of trebuchets, it gradually dawned on me that using the GW model as a guide wouldn't work. The stone and sling would fowl the spindle for the winch mechanism. With this in mind and recalling numerous artillery pieces from various re-enactment societies I moved the spindle and placed it at the very rear of the model.

The counter weight is made from the ubiquitous wooden coffee stirrers, the bolts were made by simply chopping off small sections of a cocktail stick. Once made, I filled the box with scrap pieces of foam and then topped it off with small pebbles to represent large boulders and then filled the gaps with sand all stuck in place with copious amounts of PVA wood glue.

The sling is made from the thin metal wrapper from a tube of tomato puree and all the rope/cables are made from copper wire stripped out from electrical cable. The slide itself is made from wooden coffee stirrers.

At this stage I was considering adding a ratchet mechanism using plastic card but I stopped, put my tools down and actually thought 'That's enough, it's only a gaming piece not a museum piece." 

The model does (or did before I glued everything into place) actually work in the sense that both the arm and counter balance can freely rotate and fully swing. However, I did made the counter balance too large and it hangs too low; in a full scale version it would mash into the framework and do more damage to the crew than any enemy castle.

Tuesday, 12 June 2012

Pirate Ogre Whaler - Part 3 of 3

The figure was painted using my usual 'Block, Wash and Highlight' method. As I mentioned to my mate Ade (WargamingForFun) recently I really find painting a necessary evil.


Hat & Tattoo Detail
I added the anchor and sperm whale tattoos along with his latest tally onto the ogre's shoulder.
Rear View
The false leg was painted to resemble whale bone/ivory - based on Gregory Peck's portrayal of the character Captain Ahab from the film 'Moby Dick'.

I also added a little red and green (as I believe ogres are equal opportunity killers) gore to the cleaver .

The only drawback to this figure is now I think he bears an unhealthy resemblance to the guitarist Slash from the popular 80's rock combo Guns 'n' Roses (never my cup of tea, to be honest). He's only lacking the dark poodle perm hairstyle.
I do have a couple of further ideas to that would enable me to produce possibly two more ogres on a vaguely pirate theme. These, however are both on the back burner for the immediate future as I am heading in a historical direction.

Monday, 11 June 2012

Pirate Ogre Whaler - Part 2 of 3

For several weeks, this figure stood idly by, silently watching as other figures were made and painted. Then, for some reason, I recalled a comment (made by someone on TMP - thanks Skeptic!) about a previous ogre model I had made,

"Nice idea! Now, how about a pirate ogre whaler (with harpoon, of course)?"
The answer to all my problems

Aha, what a good idea. With this in mind I used Google (All Hail) Images and obtained enough reference material to be able to scratch-build the harpoon.

The main body of the harpoon itself was made from the ever useful waste plastic sprue that is normally thrown away (but being a modeller I naturally hoard the stuff).

The metal shaft was made from metal tube (actually the cut down needle from an empty liquid poly cement applicator).

The head of the harpoon was made from greenstuff, formed into a suitable pointy shape.

The rope is from scrap copper electric cable, two strands were bent around a pen and then twisted until it has the appearance of rope.

Looking at the ogre with its false leg and harpoon - it gradually dawned on me who it reminded me of; Captain Ahab (played by the late great actor Gregory Peck) in the classic 1956 film 'Moby Dick'. As I didn't really want to make a long coat (because I'm lazy and it might just appear on another ogre figure I have in mind) the other notable item of clothing in his wardrobe was his hat. This would also help distinguish him from the other ogre figures.


After removing the previous tricorn hat I did initially consider making the new hat from greenstuff but I thought using thin plastic card would be more suitable (and easier).
I rolled a thin strip of plastic sheet into a tubular, oval shape, then clamped (with small bulldog clips) and glued it in order to hold it into its new form. Just as a little detail I cut triangular shapes into the back of the hat to indicate bite marks and hint at just how this chap might have lost his leg.

Friday, 8 June 2012

Pirate Ogre Whaler - Part 1 of 3

a.k.a Yet another pirate ogre.

This figure is the latest in the occasional series of models all based around the pirate ogre theme. These few posts record the rather torturous method I used to complete this miniature.
Initial mock up
The initial idea behind this figure was to create a figure based on the Long John Silver character from Robert Louis Stevenson's classic story 'Treasure Island'. I gave the model a greenstuff eye-patch and cut off one of the legs. I had planned on giving the figure a crutch, but more of this later.

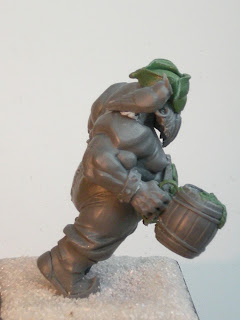
Recalling the previous ogre pirates, I had supplied one with food and drink; thinking along these lines I wanted this ogre to be a hardened booze hound so I thought 'Give him a proper drink'. Rather than just a wimpy cup I reasoned why not give him the barrel to use as a beer jug.

The jug is made from a spare barrel I had left over from a previous raid on Ade's spares box. One end was cut away to form a hollow shape (although I then went and filled it back up again with plastic off cuts and melted it all with liquid poly cement to form a smooth surface).


The pipe is made from scrap plastic sprue simply using an approximate sized drill bit to hollow out the pipe and whittling away the shaft until it looked suitably pipe-like.

Note the liberal use of Blu-Tac. I use this to try out ideas to see if they'll work. It allows you to step back (literally) and view the model from a distance to see if they look right. You will see in the inital stages I had planned on having an owl sit on the ogre's shoulder (the owl was the only model bird I could lay my hands on as I didn't fancy the hard work of making another parrot).

Once happy with the basic idea I pinned the right foot of the model to the base using a small cutoff piece of a paper clip.

The smoothly filled barrel looked quite boring so being a proper ale fan I added a nice foamy head with greenstuff. I glued the barrel directly against the ogre's hand and, when dry, added a greenstuff handle.

The earring was made from cutting away a random piece of plastic I spotted lurking in Ade's spares box.

The tricorn hat is made from the ubiquitous greenstuff.

With the belly plate, I cut away the existing triangular 'teeth' and then modelled the skull and crossbones into place with greenstuff. This was done simply by using two long strips and an oval blob of greenstuff. Then using a blade, a scribe and a sculpting tool I cut and poked the material until it looked vaguely like a 'skull and crossbones' shape.

Useless walking stick

Note the owl is still only Blu-Tac'ed into position
The false leg was made from the cap of an empty Revell poly cement needle applicator. I made the majority of this figure at roughly the same time as the pirate ogre fisherman model but I got to this stage and just hit a mental blank. The main trouble was that it looked too similar to a previous ogre figure I had made (the ogre musician/bellower) especially with the false leg. It didn't help matters that I hadn't checked to see if this was the same limb I had lopped off the other miniature. Typically it was the same left leg - ahh fudge!
Originally I thought of having the figure hobbling along with a crutch tucked under his left arm, but I simply couldn't make this work. Someone had suggested the clever idea drilling a hole between the arm and the body to accommodate the head of the crutch but I still couldn't figure how the hand would hold the support. After giving up the crutch idea I then tried to make a walking stick from sprue. But to be perfectly honest it looked awful, the angles were all wrong (see photos above). I realised that instead of looking like a fearsome monstrous brute I had just made the ogre look like a disgruntled OAP ("Go and play round your own end, pesky little ogres! Moan, moan, gripe, gripe").

Friday, 4 May 2012

Pirate Ogre Fisherman, the Highlight - Part 6 of 6

The final step of the painting technique I employ is the 'Highlight Stage'.
Completed Ogre Fisherman
This stage is obviously when, in order to create a highlight, I normally add a little Vallejo white paint from one of their dropper bottles, or another lighter complimentary shade (with red, for instance, try orange or yellow unless you actually want pink highlights). Depending on what effect you want to achieve, it is during this stage that you can gradually build up the levels of highlight by adding increasing amounts of the lighter shade to the main colour.
I realise that my highlights often appear too harsh or stripy on my photos but under normal light conditions these look far more subtle (honestly, your Honour).


Rear View
It was at this stage I also repainted the fish tails. The previous effects didn't work at all, but with the help of Google Images (praise be) I managed to find a decent photo to copy off. The figure was then given a coat of Winsor and Newton Galeria Acrylic Satin Varnish to seal the paint. I then spray the figure with Games Workshop's Purity Seal varnish which is the only varnish I know that gives a consistently matt finish. Once dry I then finally reapply the Galeria Acrylic Satin Varnish to any 'metal' parts to give them a bit more sheen and give the model an extra contrast.
Although I wasn't entirely happy with a few details, such as where the loop in the chain is joined together (I should have used strips of greenstuff rather than that unshapely blob) overall I am pleased with how the model turned out.

Hopefully these few posts have encouraged readers to have a go at modifying or converting their own miniature. You can, if you're so inclined, produce an entirely unique set of figures. The multi-part nature of these particular range of figures really do lend themselves very well to this process.

I've hit a bit of a impasse (modeller's block?) in regard to the final figure in this pirate ogre theme mini-series so he may not appear for a while.

Thursday, 3 May 2012

Pirate Ogre Fisherman, the Wash - Part 5 of 6

The next step is the 'Wash' (or shading) phase. This stage can to useful to cover up any mistakes made during painting in the block colours. I generally use Games Workshop washes but you can also use artist inks or even a darker shade of the 'block' or main colour used previously.
Ogre - Applied wash
Ogre - Applied wash
Flesh Wash applied over the areas painted with Tallarn Flesh. I don't apply the wash over all the flesh areas of the figure (which would give the same effect as the 'dip method'. I simply apply the was into the creases or folds of the model. If you use a table lamp during painting, simply hold the figure close to the light and turn the figure to and fro as this will exaggerate the shadows.

I often hold the figure upside down when applying this layer so that the wash will naturally flow in the area that would form a shadow.

Ogre profile - Applied wash
GW Devlan Mud wash was used to give depth to the 'leather' bindings on the fishing rod and Baal red to shade the right trouser leg.

Ogre Rear view - Applied wash
Gryphonne Sepia wash added to the snap bag.

You may note that I have painted the helmet over with a wash of gold paint. This is just a personal preference as I like the effect it achieves. I think it gives a bit of extra 'warmth' to contrast against the 'cold' look of the iron/steel colour components.

As mentioned in the previous post you could easily stop after this level of painting and still have an effective looking figure. But the next simple stage will again help finish off the model.

Wednesday, 2 May 2012

Pirate Ogre Fisherman, the Block - Part 4 of 6

The first stage of painting the block phase where the main colours are applied to the model.
Ogre - Block colour (main) painted
As mentioned previously this figure is painted using eight main colours. This could have been reduced even further if the trouser legs had been painted the same colour and the bag had been painted light brown (leather).

At the request of Ade, I gave this ogre the elite 'uniform' of red and black trousers.

A useful tip is to keep a record of what paints you use for particular figures. this is especially useful if you're creating a large unit or army. If not I guarantee you'll forget what exact colours you've used, if at sometime in the future you wish to add the unit and maintain the same uniform look.

The colours break down as follows:
Silver - Metal parts
Dark Brown - Wood
Light Brown - Leather
Black - Trouser leg
Red - Trouser leg
Flesh - Flesh bits (obviously)
Cream - Linen snap bag
Sand - Base
Ogre profile - Block (or main) painted
Note that this stage the right hand is still held in postion with Blu-Tac. This allowed me to paint the areas behind then anchor. If you are so inclined you could stop painting after this stage and the figure would be perfectly acceptable on the tabletop when seen from a distance (and GW tournaments). However with just a bit more time and effort you can transform the figure completely. How? I'll explain in the next couple of posts (what a tease!).

Monday, 30 April 2012

Pirate Ogre Fisherman, the Model - Part 3 of 6

This stage is where the model itself all came together. I cut the anchor shalf into two pieces and glued both parts into position on the right hand.

Fishing Rod Greenstuff

Note the crude left-handed mechanism. This is the benefit of trying a dry fit (i.e. using Blu-Tac rather than glue) first. A right-handed (i.e. standard) winding mechanism would have meant the handle would point towards the belly plate and made the 'centre' of the model look far too busy and cluttered.
Fishing Rod Mechanism
Handle is made from sprue and the cut-off handle from an ogre club.

The chain mechanism is another item from Ade's spares box. The chain itself is a standard product available from any decent model or hobbycraft shop.
The eyelets for the chain were made from a paperclip bent to form a loop. This was surprisingly difficult to achieve, I had to eventually resort to using a pair of round nose pliers. I drilled small holes into the rod and glued them into place. Greenstuff was then used to cover the joints and made to look like leather strapping by simply scoring the greenstuff with a scalpel and scribe. Fortunately the rough nature of my manufacturing technique fits in ok with the ogre pirate ogre 'look'.

The base now covered with sand. Wood glue was applied all over the base and then sand was poured over and left overnight. These pirate ogre bases have all been kept deliberately plain and uncluttered.

Friday, 27 April 2012

Pirate Ogre Fisherman, the Build - Part 2 of 6

A fisherman character obviously needs a fishing rod. After a great deal of pondering and false starts I found this two-handed weapon which would prove idea for the actual rod itself.
Fishing Rod (well almost)

The ogres right hand removed and initially covered with Milliput, but I don't think I mixed it correctly as it didn't set so I later replaced it with greenstuff.

Initial Mock Up
Note the use of Blu-Tac to position the hands and arms. This is because I still hadn't determined the final design of the mechanism and thus the final position of the limbs.

I had initially thought of using the 'chicken on a hook' part that appears on one of the ogre sprues, intending to show it as being used for bait. However, I occurred to me the fishing rod could be used as a weapon if it had a decent, and big enough, attachment such as a ball and chain. But seeing as they are pirates it seemed more appropriate to use a bloomin' great big anchor. They had cropped up on my previous ogre pirates in the form of belly plate details and tattoos etc. "What a jolly good idea" I smugly thought to myself but the realisation that I hadn't a clue how to make one quickly wiped that smile off my face.

First I thought to get a piece of plastic rod and heat it over a candle/tea light and bend it form the right shape. There are a few drawbacks to this method as I've discovered in the past. It's actually quite difficult to control the amount of bend without melting the plastic completely and dripping hot molten plastic onto your lap or even setting fire to your home (remember kids, I've made these stupid mistakes so you don't have to!).
Ogre sprue - white lines indicate the cut lines.
Staring at the sprue, (which I often do to pass the time of day) I suddenly noticed the curved corner section. Hurrah, it would be perfect. On the same piece of sprue I then quickly spotted another section that would form the body of the anchor. The white lines indicate the part of the sprue that would make up the main body of the anchor.
Anchor
Curved corner section. The sprue is trapezoidal in section so needed to be scraped with a blade and sanded to round off the plastic.
Anchor shaft
The picture above showns a similar section of the sprue that made up the 'T' piece that forms the anchor shaft. Note the liberal use of greenstuff to fill in gaps and add the pointed prongs to the end of the anchor arms.
Anchor Eye
The eye of the anchor where the chain would eventually link round was taken from another spare ogre piece.