Friday, 20 July 2012

Peasants and Pilgrims, Crusader Miniatures

In perhaps the least glamorous start to any start to a brand new project these peasant figures are the first ones painted to take part in my adaptation of the Cry Havoc/Siege board game.

After buying several packs of knights and men-at-arms miniatures I noticed that the first scenario in Cry Havoc actually involves the humble peasants, hence these figures from the 'Peasants and Pilgrims' (pack ref. MCF032 - from the late Crusades range by Crusader Miniatures) are the first figures to be posted.

The box contains eight miniatures made up of four sets of identical twins. As regular readers will know, I'll find any excuse to modify figures so I got work with a scalpel and greenstuff . The results as shown below.
Original figures

Modified figures
Originals are on the right, the modified versions on the left.


As medieval weapons were often developed from agricultural equipment I looked at the spearman and thought it would be relatively easy to convert the spear into a flail (the bill is another classic example of this form of adaption). I cut off the spearhead and superglued a small length of chain to the end, then I fixed a small length of plastic sprue to the end of the loose chain. I would strongly recommend using decent sets of tweezers for this fiddly job unless you want to glue yourself to the figure (which is precisely what I did, as per usual).


The cowls were added using greenstuff, a thin strip was wrapped round the head and then pushed and pulled into place using a metal scribe.

The small round wooden shield (targe or buckler - delete was appropriate), was taken from the Perry's plastic WoTR box set.


I forgot to take a picture of the backs of these figures so you'll have to trust me when I say I added a large leather bag to the figure on the left. It was made with just two balls of greenstuff stuck into position and then poked with a metal scribe to give the effect of creases and folds. The bag now looks too large but the greenstuff had set by the time I'd changed my mind so I left it as it was.

Another New Project - Early Medieval (Cry Havoc/Siege)

Regular readers of this blog maybe somewhat surprised to know that my first true 'love' (history-wise at least) is actually the Middle Ages. Reminiscing back to my youth, it seemed to have spent running around castles or trying to knock seven shades out of my older brother armed with a broom handle and dustbin lid pretending to be a gallant knight of the realm. I still enjoy walking over lumpy fields waffling on to friends saying, "this was once the site of a motte and bailey castle" watching as their eyes gradually glaze over as they think "yeah, yeah, it's another empty field."

As I also want to change the percentage of modelling to gaming I currently enjoy (approx 99.9% modelling, 0.1% gaming) I thought 'why not go back to where it all really began for me' - the Cry Havoc/Siege board games. Still highly regarded after all these years these particular games, covered the early medieval/late Crusades period, were my introduction to gaming using actual proper rules. The fact that the map in Siege was based on the real Welsh castle at Skenfrith, Monmouthshire, (part of the famous 'Three Castles' - Skenfrith, White Castle and Grosmont) helped as well.

New figure launches by Fireforge GamesCrusader Miniatures and recent discussions on TMP led me to find dedicated sites such as Cry Havoc Fan  and the excellent blogsites such as Perrys Heroes and 15mm Havoc have all encourged me to get some minitures painted and ready for playing.

As the Cry Havoc/Siege games are really skirmish games I took the executive decision and decided to base the figures individually. I did initially think about using round bases but eventually decided to use square bases as I reckon that I could eventually use these figures as not-Warhammer Bretonnians.
I also don't want to tie myself down to any one particular precise campaign or battle, although I will be heavily leaning towards the period dominated by the reign of Edward I, Longshanks (the well known moniker 'Hammer of the Scots' wasn't contemporary). The fact that he was also responsible for some the most impressive castles still standing in Britain, Conway, Caernarfon, Harlech and Beaumaris etc. all made making this decision easy.

I'm still trying to work out the mechanics of playing the game with miniatures as the original involved two double sided playing cards per each individual piece (to represent healthy, stunned, wounded and dead status). I remember that we used Essex miniatures to replace the cards but I can't remember how, or even if, we depicted each different status. 

I had contemplated using the original characters from the game as a painting guide but thought there are enough real heraldry schemes to use to make this project even more interesting for myself. The first figures detailed on this blog will be from the new early medieval range from Crusader Miniatures.

Thursday, 19 July 2012

Sow plus four piglets, Hovels Ltd & Pig Pen

After fancying another complete change from the usual project work I had recently completed this little vignette. This came about more by circumstance than plan, being a culmination of several bits and pieces I had scattered about the desktop.

I had bought these lovely little miniature animals (C8 - Sow plus four piglets, Hovels Ltd Link) at a show several years ago. Like so many of my other projects they patiently sat on the work desk waiting their turn. I had more recently purchased a bag of the wattle fencing by Renedra with no definite ideas of how or when I would use them. Taking two of each of the long (124mm) and short (60mm) sections I tried placing them onto random off-cut pieces of red (fireproof - in case you were wondering) MDF board from work. Eventually finding an idea piece (167 x 108mm) I then went about trying to work out how to put the set together.

I wanted to give the impression that the pigs had burrowed into the ground so using my brand new hand-held hot wire cutter (hours of fun - yep, I do need to get out more) I cut the banks of the pigpen from scrap pieces of expanded polystyrene (used as packing) to the required angle. It is certainly easier and quicker to use than a sharp knife and slightly less dangerous. 

Once happy with the shape I fixed them and the fences into position using PVA (wood)glue. Then the area outside of the fence was then covered in PVA glue, covered in fine sand and left to dry.

The shelter was made from the barbecue sticks for the uprights and the ubiquitous wooden coffee stirrers for the roof, painted various shades of grey to represent weathered wood. Once dry I marked its eventual position on the base along with the positions of the pigs. The next stage involved cutting recesses into the base board where the pigs would stand so the models would sit flush with the ground rather than above. Then using ready mixed plaster I made the mud interior of the pigpen and sparingly sprinkled a bit more fine sand to give the mud a bit of texture but ensuring there would still be smooth flat areas.

I had initially planned to poke holes into the wet plaster with a cocktail stick to create the numerous trotter prints in the wet mud. In reality I left the piece too long under my table lamp and then had to use a small hand drill to make the holes.

Once dry I painted the 'mud' with various shades of dark brown but with very few highlights.


I wanted to represent a genuine old breed of pig and remember seeing these handsome chaps that live on the farm at Kentwell Hall, a Tudor moated mansion near Long Melford, Suffolk. So I opted for the Gloucester Old Spot as I think these are the most visually interesting type. Tamworth pigs are another appealing option (I've always had a soft spot for redheads). Using Google 'All Hail' Images I had enough references to paint a fairly decent representation of the little porkers. These models are very easy to paint up.


Once happy with the piggy paint work they were then glued into position on the base. Any gaps were filled with plaster and touched up with the appropriate paint. Then the model was given the normal layers of varnish, using a high gloss varnish to represent liquid mud. The final stage was the addition of the usual grass, tufts and foliage.

This little model make an attractive addition to the table. As Winston Churchill once said,
"I am fond of pigs. Dogs look up to us. Cats look down on us. Pigs treat us as equals."

"Looks like bacon for breakfast lads"


Wednesday, 4 July 2012

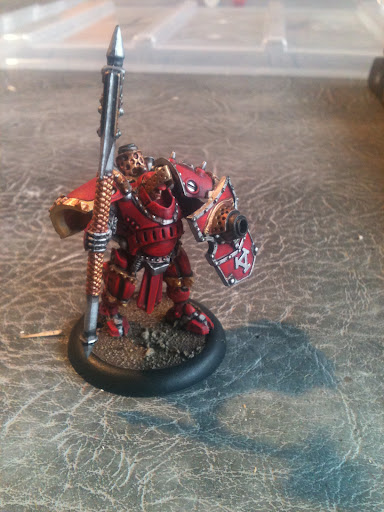
Man-o-War Shocktrooper, Warmachine (Privateer Press)

During a pleasant English summer evening (i.e. taking shelter from the awful recent weather) in my mate Ade's (WargamingForFun) man cave I was perusing his unpainted figures. To repay his hospitality (more tea and home-made cakes than a grown man can handle) I offered to paint a figure for him. As he is currently going through a Warmachine-phase, which appears to me to be a Cold War/steampunk'ish inspired game, I picked this Man-o-War Shocktrooper.

This a figure from the Khador faction (communist?), the utilitarian look and simply colour scheme did appeal to me. I even managed to play a couple of games as I could pick up the simple basics of the rules after a few games.

Normally I would assemble the model after painting but Ade had already glued it together, even so the plastic figure is very easy to paint. Following the examples in the rules boxes this model is basically red all over with gold and silver details. I employed my usual three layer technique playing particular attention with the washes to add shade to the heat affected areas around the vents and shield muzzle etc.


If you noticed a distinct improvement with the quality of the photographs that would be because I didn't take them. Ade kindly did the honours as my mom had asked to have her camera back to take with her on holiday (cheeky minx!).

I'm now painting a Kommander Sorscha Warcaster figure and will post that as soon as it's done.

Tuesday, 12 June 2012

Pirate Ogre Whaler - Part 3 of 3

The figure was painted using my usual 'Block, Wash and Highlight' method. As I mentioned to my mate Ade (WargamingForFun) recently I really find painting a necessary evil.


Hat & Tattoo Detail
I added the anchor and sperm whale tattoos along with his latest tally onto the ogre's shoulder.
Rear View
The false leg was painted to resemble whale bone/ivory - based on Gregory Peck's portrayal of the character Captain Ahab from the film 'Moby Dick'.

I also added a little red and green (as I believe ogres are equal opportunity killers) gore to the cleaver .

The only drawback to this figure is now I think he bears an unhealthy resemblance to the guitarist Slash from the popular 80's rock combo Guns 'n' Roses (never my cup of tea, to be honest). He's only lacking the dark poodle perm hairstyle.
I do have a couple of further ideas to that would enable me to produce possibly two more ogres on a vaguely pirate theme. These, however are both on the back burner for the immediate future as I am heading in a historical direction.

Monday, 11 June 2012

Pirate Ogre Whaler - Part 2 of 3

For several weeks, this figure stood idly by, silently watching as other figures were made and painted. Then, for some reason, I recalled a comment (made by someone on TMP - thanks Skeptic!) about a previous ogre model I had made,

"Nice idea! Now, how about a pirate ogre whaler (with harpoon, of course)?"
The answer to all my problems

Aha, what a good idea. With this in mind I used Google (All Hail) Images and obtained enough reference material to be able to scratch-build the harpoon.

The main body of the harpoon itself was made from the ever useful waste plastic sprue that is normally thrown away (but being a modeller I naturally hoard the stuff).

The metal shaft was made from metal tube (actually the cut down needle from an empty liquid poly cement applicator).

The head of the harpoon was made from greenstuff, formed into a suitable pointy shape.

The rope is from scrap copper electric cable, two strands were bent around a pen and then twisted until it has the appearance of rope.

Looking at the ogre with its false leg and harpoon - it gradually dawned on me who it reminded me of; Captain Ahab (played by the late great actor Gregory Peck) in the classic 1956 film 'Moby Dick'. As I didn't really want to make a long coat (because I'm lazy and it might just appear on another ogre figure I have in mind) the other notable item of clothing in his wardrobe was his hat. This would also help distinguish him from the other ogre figures.


After removing the previous tricorn hat I did initially consider making the new hat from greenstuff but I thought using thin plastic card would be more suitable (and easier).
I rolled a thin strip of plastic sheet into a tubular, oval shape, then clamped (with small bulldog clips) and glued it in order to hold it into its new form. Just as a little detail I cut triangular shapes into the back of the hat to indicate bite marks and hint at just how this chap might have lost his leg.

Friday, 8 June 2012

Pirate Ogre Whaler - Part 1 of 3

a.k.a Yet another pirate ogre.

This figure is the latest in the occasional series of models all based around the pirate ogre theme. These few posts record the rather torturous method I used to complete this miniature.
Initial mock up
The initial idea behind this figure was to create a figure based on the Long John Silver character from Robert Louis Stevenson's classic story 'Treasure Island'. I gave the model a greenstuff eye-patch and cut off one of the legs. I had planned on giving the figure a crutch, but more of this later.

Recalling the previous ogre pirates, I had supplied one with food and drink; thinking along these lines I wanted this ogre to be a hardened booze hound so I thought 'Give him a proper drink'. Rather than just a wimpy cup I reasoned why not give him the barrel to use as a beer jug.

The jug is made from a spare barrel I had left over from a previous raid on Ade's spares box. One end was cut away to form a hollow shape (although I then went and filled it back up again with plastic off cuts and melted it all with liquid poly cement to form a smooth surface).


The pipe is made from scrap plastic sprue simply using an approximate sized drill bit to hollow out the pipe and whittling away the shaft until it looked suitably pipe-like.

Note the liberal use of Blu-Tac. I use this to try out ideas to see if they'll work. It allows you to step back (literally) and view the model from a distance to see if they look right. You will see in the inital stages I had planned on having an owl sit on the ogre's shoulder (the owl was the only model bird I could lay my hands on as I didn't fancy the hard work of making another parrot).

Once happy with the basic idea I pinned the right foot of the model to the base using a small cutoff piece of a paper clip.

The smoothly filled barrel looked quite boring so being a proper ale fan I added a nice foamy head with greenstuff. I glued the barrel directly against the ogre's hand and, when dry, added a greenstuff handle.

The earring was made from cutting away a random piece of plastic I spotted lurking in Ade's spares box.

The tricorn hat is made from the ubiquitous greenstuff.

With the belly plate, I cut away the existing triangular 'teeth' and then modelled the skull and crossbones into place with greenstuff. This was done simply by using two long strips and an oval blob of greenstuff. Then using a blade, a scribe and a sculpting tool I cut and poked the material until it looked vaguely like a 'skull and crossbones' shape.

Useless walking stick

Note the owl is still only Blu-Tac'ed into position
The false leg was made from the cap of an empty Revell poly cement needle applicator. I made the majority of this figure at roughly the same time as the pirate ogre fisherman model but I got to this stage and just hit a mental blank. The main trouble was that it looked too similar to a previous ogre figure I had made (the ogre musician/bellower) especially with the false leg. It didn't help matters that I hadn't checked to see if this was the same limb I had lopped off the other miniature. Typically it was the same left leg - ahh fudge!
Originally I thought of having the figure hobbling along with a crutch tucked under his left arm, but I simply couldn't make this work. Someone had suggested the clever idea drilling a hole between the arm and the body to accommodate the head of the crutch but I still couldn't figure how the hand would hold the support. After giving up the crutch idea I then tried to make a walking stick from sprue. But to be perfectly honest it looked awful, the angles were all wrong (see photos above). I realised that instead of looking like a fearsome monstrous brute I had just made the ogre look like a disgruntled OAP ("Go and play round your own end, pesky little ogres! Moan, moan, gripe, gripe").